Using Custom Web.config Transformations in MSBUILD
Web.config transformations have been around for a while now, and a lot of developers use them in their staple day-to-day environment deployment strategies – hell, Scott Hanselman was spouting about them way back in the beginning on 2010 with his “Web Deployment Made Awesome: If you’re using XCOPY, you’re doing it wrong” post. As usual though, one size does not fit all – and in the case of Continuous Integration fans out there that may have specific build-configuration-based build and deployment scenarios (such as myself), there is the need to have finer grained control over the Web.config transformation process. If this sounds like you, then this post is aimed to deliver.
What a second… what the hell are “Web.config Transforms”?
ASP.net has had a few features that that been around for what seems like forever when it comes to abstracting away or alternating between different configuration data for your website (i’m talking about configSource functionality mostly). The features were very minimal and usually created a less-than-ideal solution for developers working on big websites in multiple environments. With the advent of Visual Studio 2010 Microsoft kindly helped us all out by taking note that “hey maybe not all websites are being built for a single server with a single configuration”… Smart guys. They created web.config transformations to help deal with this problem and Jokes aside, the feature is actually pretty cool and allows you to write a base web.config file as you normally would and then transform it for each of your environments.
Your base web.config:
<?xml version="1.0"?>
<configuration>
<appSettings>
<add key="ExampleApplicationSetting" value="Value being replaced by Transform"/>
</appSettings>
<connectionStrings>
<add name="MyConnectionString" connectionString="..." providerName="System.Data.SqlClient" />
</connectionStrings>
<system.web>
<customErrors mode="Off"/>
<compilation debug="true">
</compilation>
</system.web>
</configuration>
Your web.config transform (note the change to my connection string, my custom errors and my compilation mode):
<?xml version="1.0"?>
<configuration xmlns:xdt="http://schemas.microsoft.com/XML-Document-Transform">
<appSettings>
<add key="ExampleApplicationSetting"
xdt:Transform="SetAttributes(value)"
xdt:Locator="Condition(@key='ExampleApplicationSetting')"
value="The new value to replace after transform"/>
</appSettings>
<connectionStrings>
<add name="MySolutionDatabase" xdt:Transform="Replace" xdt:Locator="Condition(@name='MySolutionDatabase')"
connectionString="... My New Connection String ..." providerName="System.Data.SqlClient" />
</connectionStrings>
<system.web>
<customErrors xdt:Transform="Replace" mode="RemoteOnly" />
<compilation xdt:Transform="SetAttributes(debug)" debug="false" />
</system.web>
</configuration>
Read more: DZone
QR: 
How To Run Ubuntu Linux On Samsung Galaxy S III
The Galaxy S III is making some serious inroads with development that seems to be speeding up with every step. The latest big news to hit SGS3 users is Ubuntu and Backtrack Linux beeing booted onto the device. Honestly, I don’t personally see the point of using Linux on an Android device, but if it’s Android and you’re a true geek, having the option and being actually able to pull it off, is a feat on its own. As for the procedure, we have XDA-Developers forum member tiborri to thank for jotting up a tutorial, and of course, a few pieces of the tutorials have actually been borrowed from other tutorials. So if you have patience and are familiar with executing scripts, read on after the break to learn more about how you can get Linux running on your Galaxy S III.
All images below are courtesy of tiborr.
To start off, you will be needing an app called, Ubuntu Installer developed by zackthespack. This app once launched, will allow you to download and install 3 more apps that are required to get Ubuntu up and running on the device:
VNC Viewer
Android Terminal Emulator
Busybox
Needless to say your device needs to be rooted for this app to function properly. If you haven’t already done so, view our rooting guide for the Galaxy S III here. That done, to avoid any issues, install the Omega 5 ROM featured here. Make sure USB debugging is enabled on the device. Now run the app and download the Ubuntu file.
You will now need to run a script that was originally written by zacthespack (download). Once this is downloaded, copy this script (ubuntu.sh) and the ubuntu file downloaded via Ubuntu Installer onto the internal memory of the phone in a folder named Ubuntu.
With all the data in its place, you now need to run the Android Terminal, and enter the following commands:
su
cd /sdcard/ubuntu
sh ubuntu.sh
Read more: Addictive tips
Android FeelUX

As one of the leading handset manufacturers in Japan, Sharp recognized the need to address an expanding market of smartphone users. After conducting surveys in Japan and the US, the company wanted to create new Android handsets that would stand out in a crowded field and attract first-time buyers while catering to the needs of current Android customers.
Redefining the Android Mobile UI Paradigm
According to Google statistics, an estimated 850,000 devices are activated every day across the world, making Android the most popular smartphone platform. However, while many customers favor the platform’s openness, flexibility and diverse choice of handsets, an overload of branded phones without clear product differentiation can make selecting an Android device overwhelming. The traditional Android model had some fundamental usability issues, and an entirely fresh approach was the only solution to create a meaningful experience.
Sharp collaborated with frog’s team of designers and technologists to design a new mobile user-experience model, called “Feel UX”, that is uncluttered and effortless to organize and use. Unlike other handset manufacturers who historically customize Android by simply adding another layer on top of the platform, the frog team carefully curated the experience to create a new device that is straightforward for beginner Android users, yet has the flexibility in customization that advanced users love.
Read more: frog
QR: 
OpenNebula
Posted by
jasper22
at
16:36
|
About the OpenNebula.org Project
Mission
OpenNebula.org is an open-source project developing the industry standard solution for building and managing virtualized enterprise data centers and cloud infrastructures.
Vision
IaaS Cloud Computing is the next step in the evolution of the data center. Because no two data centers are the same, we do not think there's a one-size-fits-all in the cloud, and we do not try to provide a turnkey solution that imposes requirements on data center infrastructure. OpenNebula interoperability makes cloud an evolution by leveraging existing IT infrastructure, protecting your investments, and avoiding vendor lock-in. In contrast to other open-source management tools that only provide a special-purpose implementation of popular cloud interfaces on pre-defined environments, OpenNebula aims to provide a open, flexible, extensible, and comprehensive management layer to automate and orchestrate the operation of virtualized data centers by leveraging and integrating existing deployed solutions for networking, storage, virtualization, monitoring or user management.
Objectives
The OpenNebula.org project pursues the following objectives in order to lead innovation in enterprise-class cloud data center management:
Develop the most-advanced, highly-scalable and adaptable solution for building and managing virtualized data centers and cloud infrastructures
Assure the stability and quality of the software distribution
Collaborate with the most demanding users of cloud and data center management tools
Spread awareness of the Project
Support the ecosystem of open-source components being created around the Project
Support the community of users and developers contributing to the Project
Collaborate with other open-source projects and communities
Collaborate with the main research projects in cloud computing innovation
Core Values
The core values of the OpenNebula.org project are:
Openness of the processes and the technology
Excellence for being a project of the highest quality in every aspect of its operations
Cooperation with open-source efforts and research projects to advance cloud computing
Innovation in new technologies and methods to address needs of large-scale cloud deployments
Read more: OpenNebula
QR: 
ConfigSource attribute on system.serviceModel section
The configSource attribute was firstly introduced in .NET framework 2.0 to support external configuration files.
This attribute can be added to any configuration section to specify a an external file for that section. Using an external configuration source can be useful in many scenarios. For instance, you could place a section into an external configSource if you need an easy method to swap settings for the section depending on the environment (development, test, or production), or you need granular control over permissions.
Unfortunately, the system.serviceModel section group does not support this attribute. If you try to add it, you will receive the following exception:
The attribute 'configSource' cannot be specified because its name starts with the reserved prefix 'config' or 'lock'
What I found out is that you can use this attribute on the different sections under system.serviceModel such as services, behaviors or bindings.
For instance, the configuration file could look like this,
<configuration>
<system.serviceModel>
<services configSource="Services.config" >
</services>
<bindings configSource="Bindings.config">
</bindings>
<behaviors configSource="Behaviors.config">
</behaviors>
</system.serviceModel>
</configuration>
And then, each file contains the corresponding section.
Services.config
<services>
<service name="Microsoft.ServiceModel.Samples.CalculatorService"
behaviorConfiguration="CalculatorServiceBehavior">
<host>
Read more: Pablo M. Cibraro (aka Cibrax)
QR: 
ExecutionContext vs SynchronizationContext
’ve been asked a few times recently various questions about ExecutionContext and SynchronizationContext, for example what the differences are between them, what it means to “flow” them, and how they relate to the new async/await keywords in C# and Visual Basic. I thought I’d try to tackle some of those questions here.
WARNING: This post goes deep into an advanced area of .NET that most developers never need to think about.
What is ExecutionContext, and what does it mean to flow it?
ExecutionContext is one of those things that the vast majority of developers never need to think about. It’s kind of like air: it’s important that it’s there, but except at some crucial times (e.g. when something goes wrong with it), we don’t think about it being there. ExecutionContext is actually just a container for other contexts. Some of these other contexts are ancillary, while some are vital to the execution model of .NET, but they all follow the same philosophy I described for ExecutionContext: if you have to know they’re there, either you’re doing something super advanced, or something’s gone wrong.
ExecutionContext is all about “ambient” information, meaning that it stores data relevant to the current environment or “context” in which you’re running. In many systems, such ambient information is maintained in thread-local storage (TLS), such as in a ThreadStatic field or in a ThreadLocal<T>. In a synchronous world, such thread-local information is sufficient: everything’s happening on that one thread, and thus regardless of what stack frame you’re in on that thread, what function is being executed, and so forth, all code running on that thread can see and be influenced by data specific to that thread. For example, one of the contexts contained by ExecutionContext is SecurityContext, which maintains information like the current “principal” and information about code access security (CAS) denies and permits. Such information can be associated with the current thread, such that if one stack frame denies access to a certain permission and then calls into another method, that called method will still be subject to the denial set on the thread: when it tries to do something that needs that permission, the CLR will check the current thread’s denials to see if the operation is allowed, and it’ll find the data put there by the caller.
Things get more complicated when you move from a synchronous world to an asynchronous world. All of a sudden, TLS becomes largely irrelevant. In a synchronous world, if I do operation A, then operation B, and then operation C, all three of those operations happen on the same thread, and thus all three of those are subject to the ambient data stored on that thread. But in an asynchronous world, I might start A on one thread and have it complete on another, such that operation B may start or run on a different thread than A, and similarly such that C may start or run on a different thread than B. This means that this ambient context we’ve come to rely on for controlling details of our execution is no longer viable, because TLS doesn’t “flow” across these async points. Thread-local storage is specific to a thread, whereas these asynchronous operations aren’t tied to a specific thread. There is, however, typically a logical flow of control, and we want this ambient data to flow with that control flow, such that the ambient data moves from one thread to another. This is what ExecutionContext enables.
ExecutionContext is really just a state bag that can be used to capture all of this state from one thread and then restore it onto another thread while the logical flow of control continues. ExecutionContext is captured with the static Capture method:
// ambient state captured into ec
ExecutionContext ec = ExecutionContext.Capture();
and it’s restored during the invocation of a delegate via the static run method:
ExecutionContext.Run(ec, delegate
{
… // code here will see ec’s state as ambient
}, null);
All of the methods in the .NET Framework that fork asynchronous work capture and restore ExecutionContext in a manner like this (that is, all except for those prefixed with the word “Unsafe,” which are unsafe because they explicitly do not flow ExecutionContext). For example, when you use Task.Run, the call to Run captures the ExecutionContext from the invoking thread, storing that ExecutionContext instance into the Task object. When the delegate provided to Task.Run is later invoked as part of that Task’s execution, it’s done so via ExecutionContext.Run using the stored context. This is true for Task.Run, for ThreadPool.QueueUserWorkItem, for Delegate.BeginInvoke, for Stream.BeginRead, for DispatcherSynchronizationContext.Post, and for any other async API you can think of. All of them capture the ExecutionContext, store it, and then use the stored context later on during the invocation of some code.
Read more: Parallel Programming with .NET
Projection in Windows 8

בפוסט הקודם שעסק במה זה WinRT הזכרתי שאפשר לכתוב אפליקציות Metro במגוון שפות (C# & Xaml, C++ & Xaml, Js & HTML) ולעבוד מול ה-WinRT בצורה די שקופה. מי שמאפשר את זה היא ה-Language Projection.
מה היא ה-Language Projection
WinRT היא חלק מה-Windows Core, היא fully native code, והיא חושפת APIs אשר מולם אנחנו יכולים לעבוד.
כיוון ש-WinRT צריכה לשרת כמה שפות (C#, C++, js), דרושה שכבת תיווך שתחשוף אותה בצורה המותאמת לאותה שפה, וזו שכבת ה-Projection אשר מעליה נמצאת האפליקציה שלנו.
אובייקט WinRT מממש 2 ממשקים חשובים:
IUnknown – כיוון ש-WinRT עובדת מעל COM, כל אובייקט צריך לממש את Iunknown, זה ממשק שהיה קיים עוד לפני WinRT, והוא מסמל אובייקט שאנחנו לא יודעים עליו כלום.
IInspectable – כל אובייקט WinRT מממש IInspectable, זה ממשק חדש שמאפשר לחקור את האובייקט דרך ה-MetaData שלו וזה מה ששכבת ה-Projection עושה.
MetaData
ה-MetaData נמצא בתוך קובץ WinMD (Windows Meta Data)
אפשר לפתוח אותו עם ILDASM ולראות מה הוא מכיל:
Read more: Windows 8
QR: 
תמונה אחת שווה אלף מילים: כיצד מנהלי מוצר יכולים לשתף את חזונם באמצעות Storyboarding של Visual Studio 2012
Posted by
jasper22
at
20:03
|

התסריט הבא בהחלט לא דמיוני: מנהל המוצר הגדיר ביחד עם הלקוח את הדרישות, הצוות סיכם את ההבנות במסמך מפורט, וכעבור חצי שנה של עיצוב ופיתוח ,מוצגת ללקוח גרסה ראשונית של המוצר. "אבל לא כך התכוונתי שכך זה יראה" הלקוח מתעצבן וארשת של אכזבה עוטה את פניו.
ה- UI הוא שער הכניסה של המוצר שלנו, ולכן חשוב לשתף את הלקוח או השותפים שלנו בחזות שלו מוקדם כלל האפשר על מנת להקטין את האפשרות להפתעות הנובעות מהסובייקטיביות של הבנת הדרישות. אבל כיצד ניתן להציג את ה-UI עוד לפני שלב התכנון המוצר? ובכן, כלי ה-Storyboarding הכלול ב- 2012 Visutal Studio מאפשר בדיוק את זה.
יכולות ה- ALM של TFS מרחיבות את מעגל המשתתפים בתהליך הפיתוח ומאפשרים שיתוף פעולה בין הצוותים השונים על גבי פלטפורמה אחת אחודה. אם ב-Team System 2005 דיברנו על פלטפורמה אשר מיועדת בעיקר למפתחים, הרי שבגירסת 2008 הורחב המעגל למשתמשים מחוץ לצוותי הפיתוח עם ה-Team System Web Access , ובגירסת TFS 2010 הורחב המעגל לצוותי הבדיקות באמצעות ה-Test Manager. ב- VS 2012 שוב מרחיבים את המעגל וכוללים את מנהלי המוצר והמעצבים ונותנים להם כלי ייעודי בו יכלו לשתף את צוותי הפיתוח בחזונם.
כלי ה-Storyboarding הינו למעשה תוסף ל- PowerPoint, המאפשר ליצור אב-טיפוס של ה-UI תוך שימוש באלמנטים וקונטרולים של מערכת ההפעלה (גם PC וגם Mobile), אשר זמינים כחלק מגלריה עשירה של אלמנטים. כך באמצעות גרירה פשוטה של אלמנטים (בדומה לפעולה שנעשית ב-Visio) ניתן להגדיר את הממשק בצורה ברורה וחזותית. למעשה, עצם הבחירה בעבודה עם PowerPoint מאפשרת יתרונות רבים כמו זמינות, פשטות, וכמובן שיתוף בכלי ותיק ומוכר שמאפשר למשתמש היצירתי לחלוק את חזונו עם שותפיו.
התוצר הסופי משולב כחלק מתהליך הפיתוח (מקושר ל- User Story work item) ונותן רקע והקשר למשימות השונות. למשל, משימה לפיתוח קונטרול מסויים מקושרת לקובץ ppt של המסך הרלוונטי. המתכנת או המעצב מקבל תיאור מילולי של הדרישה בצירוף מקבץ תמונות שכותב הדרישה צירף וביתר קלות לממש אותה. וזאת ללא צורך ביכולת טכנית של כותב הדרישה. כמו כן, במהלך הפיתוח ניתן להשוות בין מה שפותח בפועל למה שתוכנן.
Storyboarding בתוך PowerPoint
כאמור ה-Storyboarding משולב כתוסף ל- PowerPoint. הוא מופיע בתפריט העליון כתפריט Storyboarding ותחתיו ribbon עם שלל אפשרויות.
Read more: בלוג MSDN ישראל
QR: 
WCF on TCP : Keep your connections alive
Posted by
jasper22
at
19:58
|
I recently had a customer coming in with question and request on WCF connection pooling, which is very valid. I was almost convinced that answer to his question would be 'by design' but what worried me was if there is a solution for his predicament. To my pleasant surprise, mighty WCF team did think about the scenario and 'by design' there was a solution to his exact problem.
He is using net.tcp port sharing on the server for two different WCF services configured with net.tcp binding. The client code is such that proxy is created every time, service called and proxy closed. This sequence could be done for two services in any required combinations, lets say by calling Service 1() and Service2(). If Service1() is called repeatedly, TCP connection created in first call is pooled and reused. This is nice and as expected to save on connection establishment costs every time. But as soon as Service2() is called, TCP connection used for Service1() is reset. This sounds inappropriate. Seems, cost of port sharing is that pooled connection for Service1 has to be replaced with new connection to Service2. Very inefficient in an enterprise scenario where client makes random calls to Service1 and Service2 in volume as connection will be reset each time.
Whoever plays with TCP connection pooling is almost certain to stumble upon this: http://kennyw.com/work/indigo/173
Solution to my customer's predicament lies in this line taken from above link "Our connection pool is configurable through TcpConnectionPoolSettings/NamedPipeConnectionPoolSettings. These settings include a GroupName that we use for isolation"
You may think of it like this. TCP connection pool in WCF is identified with 'Port Number' and 'GroupName' (possibly more but only these are relevant for our purpose). If you omit 'GroupName', WCF provides a default. If you are not explicitly providing 'connectioPoolSettings', you are in effect omitting 'GroupName'. Since both the endpoints (for Service1 and Service2) use same port and have same 'GroupName' (Default), implies both endpoints will use same connection pool Id. When Service2 needs to be reached, its connection pool is already in place at client side but WCF infrastructure need to reset the connection to same port.
Use 'GroupName' to isolate connection pools for two endpoints and you can have connections alive when switching from Service1 to Service2 in there own respective pools.
This does mean that you will need to resort to custom binding but that’s an acceptable cost for such a huge benefit. A typical client config to achieve desired behaviour with net.tcp transport will look like this:
<?xml version="1.0" encoding="utf-8" ?>
<configuration>
<system.serviceModel>
<bindings>
<customBinding>
<binding name = "bindingA">
<tcpTransport>
<connectionPoolSettings groupName="connectionPoolA"/>
</tcpTransport>
Read more: DistributedWorld
QR: 
Stiltwalker reCAPTCHA killer
Stiltwalker is a proof of concept tool that defeats Google's reCAPTCHA with an insanely high accuracy (99%). We have released all of our research, code, tools and examples used in the reCAPTCHA domination. You can get the slides here and the video is at the bottom of the page.
We accomplished this with a combination of Machine Learning, hashing methods, keyspace reduction tactics, and taking advantage of an overall limited number of captchas. Specifically, Stiltwalker goes head to head against reCAPTCHA'S audio captcha system and defeats all but a sliver of it's challenges.
For all questions, comments, and fuckyous, please email the team at stiltwalker@dc949.org
We developed everything using Ubuntu 10.04, Ubuntu 11.04, and Debian 6, however it should work on any Linux distribution without too much effort. The one thing we noticed when testing it on Ubuntu 12.04 is that it comes with a slightly different version of SoX, which has some changes which drops accuracy from 99% to around 60%. So for best results, you'll want to use SoX v14.3.0 (or v14.3.1), but we'd advice to steer clear of v14.3.2 unless you want to collect tens of thousands of samples, solve them manually and then train the neural net using this version of SoX. If you go through the hassle of retraining, the newer version of SoX should work just fine.
So, for those running [any version of] Ubuntu, the easiest way to get started will be to just add our repository to /etc/apt/sources.list like so (if you're using something other than lucid, just change the codename accordingly):
deb http://repo.dc949.org/ lucid main
Now you're just a simple `apt-get update` and `apt-get install stiltwalker stiltwalker-md5solver stiltwalker-phashsolver stiltwalker-training` away from having everything you need.
For those of you who don't have Ubuntu, you'll have to download the tar.gz version (and optionally the 380 MB md5 files) and make sure you have all the dependencies (octave, python2.7, curl, sox, libsox-fmt-all, libphash0-dev, libphash0, cimg-dev). As an aside, you can use python 2.6, but you'll need to go out and get python-argparse and python-imaging as these libraries aren't included by default until 2.7.
So at this point you should have everything you need to get started, so now what? Well, you can play with our sample programs like complete.py. One way to run it would be thusly:
python complete.py -s 1 md5 -s 1 neural 32 theta_values_both_32_1536_500.mat -l 5
This will solve 5 captcha (from the recaptcha demo page) using the md5 solver, and if that can't find the answer, it'll use the neural network. For more help, use --help and check out all the options.
Read more: Defcon Group 949
Publicly available PCAP files
This is a directory over various packet capture repositories which are freely and publicly available on the Internet. Most of the sites listed below share their PCAP files as full content, but some do unfortunately only have truncated frames.
PCAP Repositories
Wireshark Sample Capures
OpenPacket.org Capture Repository (maintained by JJ Cummings created by Richard Bejtlich)
Captures from the "2009 Inter-Service Academy Cyber Defense Competition" served by Information Technology Operations Center (ITOC), United States Military Academy
Over 4 GB of network forensic training data from DEEP (Digital Evaluation and Exploitation Department of Computer Science, Naval Postgraduate School). Case details can be found at Jesse Kornblum's blog.
http://domex.nps.edu/corp/scenarios/2009-m57/net/ (HTTP download)
http://torrent.ibiblio.org/doc/187/torrents (Torrent download)
http://domex.nps.edu/corp/scenarios/2008-nitroba/ (Read more on the Digital Corpora website)
PacketLife.net Packet Captures (Jeremy Stretch)
MOME database
EvilFingers PCAPs
Laura's Lab Kit v.9 ISO image
Read more: SourceForge.net
QR: 
LinkedIn Leaked hashes password statistics (@StefanVenken)
Based on the leaked 6.5 Million hashes,
1.354.946 were recovered within a few hours time with HashCat / Jtr and publicly found wordlists on a customer grade laptop.
This report was created with pipal from @Digininja
Total entries = 1354946
Total unique entries = 1354946
Top 10 base words
link = 1808 (0.13%)
alex = 1215 (0.09%)
mike = 1146 (0.08%)
june = 1065 (0.08%)
july = 891 (0.07%)
john = 882 (0.07%)
chris = 766 (0.06%)
love = 749 (0.06%)
april = 725 (0.05%)
mark = 669 (0.05%)
Password length (length ordered)
6 = 281193 (20.75%)
7 = 211946 (15.64%)
8 = 444338 (32.79%)
9 = 203826 (15.04%)
10 = 121783 (8.99%)
11 = 51138 (3.77%)
12 = 24377 (1.8%)
13 = 9237 (0.68%)
14 = 4237 (0.31%)
15 = 1688 (0.12%)
16 = 1112 (0.08%)
17 = 37 (0.0%)
18 = 22 (0.0%)
19 = 7 (0.0%)
20 = 8 (0.0%)
21 = 3 (0.0%)
22 = 4 (0.0%)
23 = 4 (0.0%)
24 = 2 (0.0%)
27 = 2 (0.0%)
34 = 2 (0.0%)
40 = 2 (0.0%)
Password length (count ordered)
8 = 444338 (32.79%)
6 = 281193 (20.75%)
7 = 211946 (15.64%)
9 = 203826 (15.04%)
10 = 121783 (8.99%)
11 = 51138 (3.77%)
12 = 24377 (1.8%)
13 = 9237 (0.68%)
14 = 4237 (0.31%)
15 = 1688 (0.12%)
16 = 1112 (0.08%)
17 = 37 (0.0%)
18 = 22 (0.0%)
20 = 8 (0.0%)
19 = 7 (0.0%)
23 = 4 (0.0%)
22 = 4 (0.0%)
21 = 3 (0.0%)
34 = 2 (0.0%)
24 = 2 (0.0%)
27 = 2 (0.0%)
40 = 2 (0.0%)
Read more: Pastebin
QR: 
LZ4
This is a message from the MailScanner E-Mail Virus Protection Service
----------------------------------------------------------------------
The original e-mail attachment "msg-4672-14.txt"
is on the list of unacceptable attachments for this site and has been
replaced by this warning message. Due to limitations placed on us by the Regulation of Investigatory Powers
Act 2000, we were unable to keep a copy of the original attachment. At Sun Jun 10 00:13:09 2012 the virus scanner said:
No programs allowed (msg-4672-14.txt)
----------------------------------------------------------------------
The original e-mail attachment "msg-4672-14.txt"
is on the list of unacceptable attachments for this site and has been
replaced by this warning message. Due to limitations placed on us by the Regulation of Investigatory Powers
Act 2000, we were unable to keep a copy of the original attachment. At Sun Jun 10 00:13:09 2012 the virus scanner said:
No programs allowed (msg-4672-14.txt)
LZ4 description
LZ4 is a very fast compressor, based on well-known LZ77 (Lempel-Ziv) algorithm.
Originally a fork from LZP2, it provides better compression ratio for text files and reaches impressive decompression speed, in the range and beyond 1GB/s per core (!), especially for binary files. These speeds are scalable with multi-threading modes, quickly reaching RAM speed limits on multi-core systems.
LZ4 compression format is detailed in a dedicated post.
LZ4 is available as a C Open Source project, hosted on Google Code, under a BSD license.
A port of LZ4 in C# language is provided by Clayton Stangeland at GitHub.
A JNI wrapper of LZ4 for Java language is provided by Binglin Chang at GitHub.
A binding for Python has been created by Steeve Morin, available at Pypi.
A binding for Perl has been created by Gray, available at Cpan.
A binding for Ruby has been created by Komiya Atsushi, available at RubyGems.
A binding for Haskell has been completed by Mark Wotton, available at Haskell Hackage
A port of LZ4 in Go language is provided by Branimir Karadzic at GitHub.
A wrapper of LZ4 for LUA language is provided by Christophe Delord at cdsoft.
The -c1 mode serves as a living demo for MMC (Morphing Match Chain) search algorithm (explained here).
The -c2 mode is equivalent to lz4hc.
Download :
v1.3 : Windows LZ4 installer (setup)
v1.3 : LZ4 Command Line Utility for Windows (stand alone zip, no installation)
What's new :
- c0 mode : small compression improvement
- c2 mode : small compression improvement
- c2 mode : large compression speed improvements
- improved i/o performance
Read more: RealTime Data Compression
QR: 
How Can I View MSMQ Messages and Queues?
Posted by
jasper22
at
09:59
|
I’m working with NServiceBus to send messages to and from different parts of my application. NServiceBus is a mature tool that sits on top of MSMQ and provides a great developer experience for working with a number of different scenarios. One thing that’s challenging when working with queues is figuring out where a message went when it doesn’t show up at the other end of the message bus. Where did things go wrong? How can I see the messages in the queue for MSMQ? Is the queue set up and working?
It turns out that there is built-in support for viewing details of MSMQ baked into the MMC snap-in, though it’s not immediately obvious where to find it. It’s actually under Computer Management > Services and Applications > Message Queuing. Once you get that far, you’ll see a listing of Outgoing Queues, Private Queues, System Queues, and Triggers. You most likely are interested in Private Queues. Here’s a listing of my Private Queues on my dev machine at the moment:

If you want to look at a particular message (that no application has picked up), you can drill down into the queue and inspect the Queue messages. Double-clicking on one will show you details of its contents:
Read more: Ardalis
QR: 
Visual Studio 2012 and WinDbg Integration
Posted by
jasper22
at
09:57
|
Microsoft has always provided two primary debugging experience: Visual Studio and Debugging Tools for Windows (a.k.a WinDbg). Each debugger provided a very different debugging experience (both from a capabilities point of view as well as usability). WinDbg was most commonly used when you had the need for low level debugging and was also not very user friendly requiring a steep learning curve. Visual Studio on the other hand was a very user friendly type of debugger but not always suited for low level type of debugging. Fortunately, with the introduction of Visual Studio 2012 (beta) both experiences are now folded into the Visual Studio debugger.
To start using the powerful WinDbg commands and extensions in Visual Studio 2012 it requires that you install the WDK on top of Visual Studio 2012. Once the install is completed you will notice a new transport as shown below:

In the transport dropdown there will be several new choices including Windows User Mode Debugger which is what you want to pick to enable the WinDbg experience. Once you select your process and click attach the debugger immediate window will be displayed and serves essentially the same purpose as the WinDbg command window:
Read more: MarioHewardt
QR: 
BackgroundWorker Helper using Lambda Expressions
Posted by
jasper22
at
09:54
|
Introduction
I have found that using Lambda Expressions with the BackgroundWorker makes maintenance much easier since you can have everything together in a single method. You can implement the BackgroundWorker using Lambdas without any sort of helper class very easily:
using (var backgroundWorker = new BackgroundWorker())
{
Debug.Print(string.Format("Start BackgroundWorker {0}",
sw.ElapsedMilliseconds));
backgroundWorker.DoWork += (s, e) =>
{
var baskets = FoxDataAccess.GetOrderBaskets().
Select(i => new StaggedBlotterOrderBasketViewModel(i));
var mainList = new ObservableCollection
<StaggedBlotterOrderBasketViewModel>(baskets);
e.Result = mainList;
};
backgroundWorker.RunWorkerCompleted += (s, e) =>
{
Debug.Print(string.Format("Completed BackgroundWorker {0}",
sw.ElapsedMilliseconds));
_mainList = (ObservableCollection
<StaggedBlotterOrderBasketViewModel>)e.Result;
RaisePropertyChanged("MainListSource");
Debug.Print(string.Format("Converted Basket Data {0}",
sw.ElapsedMilliseconds));
IsBusy = false;
};
backgroundWorker.RunWorkerAsync();
However, using a helper can slightly reduce the code and do exactly the same thing:
Read more: Codeproject
QR: 
Quick Ways to Boost Performance and Scalability of ASP.NET, WCF and Desktop Clients
Posted by
jasper22
at
09:49
|
Introduction
There are some simple configuration changes that you can make on machine.config and IIS to give your web applications significant performance boost. These are simple harmless changes but make a lot of difference in terms of scalability. By tweaking system.net changes, you can increase the number of parallel calls that can be made from the services hosted on your servers as well as on desktop computers and thus increase scalability. By changing WCF throttling config, you can increase the number of simultaneous calls WCF can accept and thus make most use of your hardware power. By changing ASP.NET process model, you can increase the number of concurrent requests that can be served by your website. And finally, by turning on IIS caching and dynamic compression, you can dramatically increase the page download speed on browsers and overall responsiveness of your applications.
System.net Changes
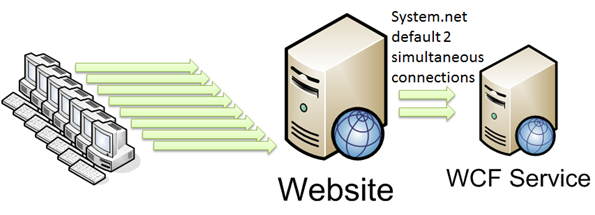
By default, system.net has two concurrent connections per IP allowed. This means on a webserver, if it’s calling WCF service on another server or making any outbound call to a particular server, it will only be able to make two concurrent calls. When you have a distributed application and your webservers need to make frequent service calls to another server, this becomes the greatest bottleneck.

Similarly, if you have a desktop application which is trying to make several webservice calls to the server, the system.net setting on the client computer’s machine.config will only allow two concurrent calls to your webserver. If your app makes many concurrent calls to your webserver, then this becomes the main bottleneck. No matter how fast your client app and server are, the two concurrent limit will kill it.
Read more: Codeproject
QR: 
New DoS tool lets a single PC bring down an Apache server
Posted by
jasper22
at
09:48
|
Recently discovered malware circulating online gives miscreants a small arsenal of denial-of-service attack tools, including a relatively new one that allows a single PC to take down an Apache webserver, a researcher said.
MP-DDoser, as documented in a blog post by Arbor Networks researcher Jeff Edwards, implements an exploit known as "Apache Killer," which first came to light last August. Researchers said then that it worked by sending Apache servers multiple GET requests containing overlapping byte ranges, consuming all memory on a target system. The Arbor post suggested the technique worked against other webserver applications.
"The core of the attack involves the sending of a very long-range HTTP header that is intended to bring webservers (especially Apache) to their knees by forcing them to do a great deal of server-side work in response to a comparatively small request," Edwards wrote. "It is therefore one of the more effective low-bandwidth, 'asymmetrical' HTTP attacks at the moment."
MP-DDoser, aka IP-Killer, also contains other denial-of-service exploits, including one that closely resembles "Slowloris," another attack that allows a single PC to bring large websites to their knees. Apache Killer has also been incorporated into another DoS bot known as Armageddon.
Read more: Ars Technica
QR: 
Create a working compiler with the LLVM framework, Part 1
Posted by
jasper22
at
09:46
|
The LLVM (formerly the Low Level Virtual Machine) is an extremely powerful compiler infrastructure framework designed for compile-time, link-time, and run time optimizations of programs written in your favorite programming language. LLVM works on several different platforms, and its primary claim to fame is generating code that runs fast.
The LLVM framework is built around a well-documented intermediate representation (IR) of code. This article—the first in a two-part series—delves into the basics of the LLVM IR and some of its subtleties. From there, you will build a code generator that can automate the work of generating the LLVM IR for you. Having an LLVM IR generator means that all you need is a front end for your favorite language to plug into, and you have a full flow (front-end parser + IR generator + LLVM back end). Creating a custom compiler just got simplified.
Getting started with the LLVM
Before you start, you must have the LLVM compiled on your development computer (see Resources for a link). The examples in this article are based on LLVM version 3.0. The two most important tools for post-build and installation of LLVM code are llc and lli.
llc and lli
Because LLVM is a virtual machine (VM), it likely should have its own intermediate byte code representation, right? Ultimately, you need to compile LLVM byte code into your platform-specific assembly language. Then you can run the assembly code through a native assembler and linker to generate executables, shared libraries, and so on. You use llc to convert LLVM byte code to platform-specific assembly code (see Resources for a link to more information about this tool). For directly executing portions of LLVM byte code, don't wait until the native executable crashes to figure out that you have a bug or two in your program. This is where lli comes in handy, as it can directly execute the byte code. lli performs this feat either through an interpreter or by using a just-in-time (JIT) compiler under the hood. See Resources for a link to more information about lli.
llvm-gcc
llvm-gcc is a modified version of the GNU Compiler Collection (gcc) that can generate LLVM byte code when run with the -S -emit-llvm options. You can then use lli to execute this generated byte code (also known as LLVM assembly). For more information about llvm-gcc, see Resources. If you don't have llvm-gcc preinstalled on your system, you should be able to build it from sources; see Resources for a link to the step-by-step guide.
Hello World with LLVM
To better understand LLVM, you have to learn LLVM IR and its idiosyncrasies. This process akin to learning yet another programming language. But if you have been through C and C++ and their quirks, there shouldn't be much to deter you in the LLVM IR. Listing 1 shows your first program, which prints "Hello World" in the console output. To compile this code, you use llvm-gcc.
Listing 1. The familiar-looking Hello World program
#include <stdio.h>
int main( )
{
printf("Hello World!\n");
}
To compile the code, enter this command:
Tintin.local# llvm-gcc helloworld.cpp -S -emit-llvm
After compilation, llvm-gcc generates the file helloworld.s, which you can execute using lli to print the message to console. The lli usage is:
Tintin.local# lli helloworld.s
Hello, World
Read more: IBM
QR: 
Differences Between NHibernate and Entity Framework
Posted by
jasper22
at
09:42
|
Introduction
NHibernate and Entity Framework are two of the most popular O/RM frameworks on the .NET world. Although they share some functionality, there are some aspects on which they are quite different. This post will describe this differences and will hopefully help you get started with the one you know less. Mind you, this is a personal selection of features to compare, it is by no way an exhaustive list.
History
First, a bit of history. NHibernate is an open-source project that was first ported from Java’s venerable Hibernate framework, one of the first O/RM frameworks, but nowadays it is not tied to it, for example, it has .NET specific features, and has evolved in different ways from those of its Java counterpart. Current version is 3.3, with 3.4 on the horizon. It currently targets .NET 3.5, but can be used as well in .NET 4, it only makes no use of any of its specific functionality. You can find its home page at NHForge.
Entity Framework 1 came out with .NET 3.5 and is now on its second major version, despite being version 4. Code First sits on top of it and but came separately and will also continue to be released out of line with major .NET distributions. It is currently on version 4.3.1 and version 5 will be released together with .NET Framework 4.5. All versions will target the current version of .NET, at the time of their release. Its home location is located at MSDN.
Architecture
In NHibernate, there is a separation between the Unit of Work and the configuration and model instances. You start off by creating a Configuration object, where you specify all global NHibernate settings such as the database and dialect to use, the batch sizes, the mappings, etc, then you build an ISessionFactory from it. The ISessionFactory holds model and metadata that is tied to a particular database and to the settings that came from the Configuration object, and, there will typically be only one instance of each in a process. Finally, you create instances of ISession from the ISessionFactory, which is the NHibernate representation of the Unit of Work and Identity Map. This is a lightweight object, it basically opens and closes a database connection as required and keeps track of the entities associated with it. ISession objects are cheap to create and dispose, because all of the model complexity is stored in the ISessionFactory and Configuration objects.
Read more: Development With A Dot
QR: 
Subscribe to:
Posts (Atom)