This is a mirror of official site: http://jasper-net.blogspot.com/

Understanding Windows Identity Foundation (WIF) 4.5

| Friday, December 7, 2012
First things First 

If you are looking for an article that show a lot of code and dissects the new WIF 4.5 APIs, then you won’t find what you need here.

My aim in this article is to explain the “why” and the “what” rather than the “how”. Once you understand that, the “how” becomes really simple. This article does not assume pre-knowledge of the topics of federation, claims, and WIF so it’s suited for beginners. However, I think that also mid-level knowledge audience will also benefit from it. If you’re like super-expert, well please contact me to help me in my current projectJ.
What is Exactly the Problem? 

Authentication (and authorization) is an ever present challenge for almost all applications. The challenge that these applications face is the same: authentication logic creeps into the application code and becomes coupled with it; any change to the authentication requirements will result in a change in the application itself.

Say for example that your user store is SQL Server and new business mandates adding an existing Oracle-based user store to your list of users, or maybe you want to mix your authentication to support both custom user stores (SQL Server or Oracle) with Active Directory user store. And what about social media? It’s increasingly popular nowadays for applications to allow authentication via services such as Google and Facebook.

Here is another tough case: assume you used to ask you users for username/password combination to log in. Now based on certain needs, you want them also to supply additional information such as a one-time code. This will certainly lead to UI change for your login page as well as code change.

In all these cases, something has to change in your code. Of course, having a good architecture with a proper separation of concerns will ease up the change. However, the idea is that you still have to manage this authentication logic instead of focusing on the business side of your application.

Claims-based authentication is the architecture that solves this problem.
Claims-based Authentication 

Claims-Based architecture allows you to delegate authentication logic into another entity. This entity is a “some” layer which abstracts all authentication related coding and gives your application what it needs: is the user authenticated or not, and some information about the user (called claims or assertions) that lets your application take authorization decisions.

The claims-based architecture defines the following actors:  

Subject: the entity that needs to be authentication. This can be a user that wants to log in to your application, or a piece of code in your application that wants to access a web service.
Relying Party (RP): the application (in case the Subject is a user) or the web service (in case the Subject is application code) that needs to delegate the authentication logic
Identity Provider (IP): the entity (that “some” layer mentioned before) that actually holds the authentication logic. The IP talks to the user stores as appropriate and performs actual authentication.
Claim: When an IP performs successful authentication, it returns to the RP a set of claims. Claims are statements about the authenticated entity – for example birth date, department, role, etc… – that gives the RP information to take authorization decisions.
Token: Claims travel inside a token. Although a token can be a username/password combination or even a simple string such as bearer token in OAuth 2.0; in this context tokens can be either XML-based such as SAML tokens or binary-based such as X.509 certificates. 

In addition to the above definitions, WS-Federation and WS-Trust protocols define another term called Secure Token Service (STS). STS is the web service exposed by the IP that provides the authentication service. 

Before the claims-based flow can start, the RP and IP need to publish their policies. In abstract terms, a policy is a contract published by an entity that specifies the terms and conditions that other entities must obey before establishing communication.

In this context, the policy published by the IP specifies the supported protocol(s) and security requirements as well as supported claim types. Similarly, the policy published by the RP specifies its own protocol, security, and claims requirements as well as the list of IPs it trusts to delegate authentication to. 

The rest of the article discusses WS-Federation (and related WS-standards) and its implementation in WIF, while I will also briefly discuss SAML 2.0. 

Read more: Codeproject

Posted via email from Jasper-net

Trend Watching: 10 главных трендов 2013 года

|
Как обычно в конце года масса изданий публикует подборки различных трендов, кто-то пишет свои идеи и домыслы, кто-то предсказывает аля Нострадамус. А есть компании, которые на этом зарабатывают, чьи предсказания покупают и они сбываются.

Например, Trend watching, компания которая занимается поиском и анализом закономерностей. Их клиентами являются, как очень крупные бизнеса, так и небольшие команды. На первый взгляд результаты аналитики могут показаться странными и необычными, но следуя теории длинного хвоста, вполне могут стать идеями для создания нового сервиса или продукта. Ведь эти тренды, фактически синоним уже готового запроса аудитории.

Вашему вниманию 10 самых важных пользовательских трендов от компании Trend Watching на ближайшие 12 месяцев:

1. Ожидатели и кост-контроллеры

Так как пользователи будут принимать еще больше участия в создании, запуске и развитии новых продуктов, сервисов и любимых брендов, ожидайте, что предзаказы, краудфандинг и процесс привлечения клиентов перевернут традиционную систему «потребления» в 2013 году.
В ближайшем году вы увидите увлеченных пользователей, которые откроют для вас две абсолютно новые, инновационные модели потребления: «ожидатели» и «кост-контроллеры»

«Ожидателям» нравится быть вовлеченными в процесс появления и продвижения продуктов и сервисов до их официального релиза. И, благодаря бесчисленным платформам краудфандинга и новым технологиям производства, которые постепенно становятся повседневной практикой (так же, как и «культ предпринимательства»), бизнес откроет для вас новые двери, куда, по идее, и должны «ломануться» эти нео-пользователи.

В связи с этим, вас не должен удивлять тот факт, что в этом году «ожидатели» потратили на краудфандинговых платформах $2,8 млрд (для сравнения: $530 млн в 2009, $1,3 млрд в 2011).

А кто же кроме «ожидателей»? Как насчет «кост-контроллеров» – пользователей, которые переходят от стандартного потребления к инвестированию в любимые бренды (даже не имея в своем портфеле акций этих компаний).

Однако оба этих типа нео-потребителей рассчитывают на то, что на выходе они получат и финансовую и эмоциональную отдачу, и поэтому, только те бренды, которые открыты, дружелюбны, честны, доверительны и «прозрачны», привлекут их.

Примеры:

ZAOZAO: социальный сервис для любителей моды.
Запущенный в Сентябре 2012 в Гонконге, сервис именует себя как «социальный предзаказник». Эта новая платформа позволяет модным дизайнерам размещать свои «предварительные» творения, чтобы при помощи краудфандинга получить предзаказы, тем самым спонсируя дальнейшую работу. 

Read more: Habrahabr.ru

Posted via email from Jasper-net

Windows 8 Game Development using C#, XNA and MonoGame 3.0: Building a Shooter Game Walkthrough – Part 1: Overview, Installation, MonoGame 3.0 Project Creation

|
Inline image 1

Overview

Casual game developers have been using XNA since 2004 for ease of create games for Windows, XBOX and most recently Windows Phone. XNA is a .NET framework for game development providing a content pipeline and load functionality for game asset, animation, math, sound and user input tracking via gamepad, mouse, keyboard and touch with game logic organized in a straightforward game loop architecture.

Game development is not trivial undertaking and XNA was a great framework to start down the path for a great number of novice game developers and/or students and developers who wanted to learn how to create quality game applications. XNA along with Visual Studio made it as easy as File –> New –> XNA Game Studio Project and you were off and running.

MonoGame is an open source cross platform implementation of the XNA namespace and class model. The goal of MonoGame is to provide XNA developers with a framework to build applications that will run on Xbox 360, Windows, Windows 8, and Windows Phone while providing the ability to port the game using the same C #codebase to run natively on the iOS, Android, Mac OS X, and Linux platform with minimal effort. With these goals in mind, the MonoGame motto therefore is to "Write Once, Play Everywhere". The technologies that make the MonoGame API cross-platform power possible are:

  • OpenTK - a low-level C# library that wraps OpenGL, OpenCL and OpenAL for 3D graphics.
  • SharpDX - an open-source implementation of the full DirectX API for .NET which allows for development of high performance games, 2D and 3D graphics rendering, and real-time sound
  • Lidgren.Network - a networking library for .NET framework which uses an UDP socket to provide an API for connecting a client to a server, as well as, reading and sending messages
 

The game you will be making in this walkthrough is using the MSDN Shooter tutorial. Shooter is a particular type of game with a set of well-defined limits around what it does when the user interacts with it. This tutorial is a good starting point for learning game development with XNA and publishing a game running on Windows 8 platform using XNA leveraging MonoGame. In addition to leveraging this technology for Windows 8, you can use the MonoGame technology for native cross-platform development with other mobile platforms.


Setting Up Your Development Environment

Before you can write games for Windows 8 using MonoGame, you mush setup your enviroment and your IDE to do so. I have outlined the steps below for getting your environment created. Please follow and perform the following steps in the order stated to successfully prepare your computer for XNA Development with MonoGame:

  • Install Microsoft Windows 8.
  • Install Games for Windows
  • Install Windows Phone 8 SDK or Visual Studio 2010 Express for Windows Phone
  • Why do I need Visual Studio 2010? There is a feature of XNA called the Content Pipeline, a pre-compiler step in the preparation of graphic and audio assets for use at runtime in XNA. This feature is not implemented in MonoGame. You can leverage VS 2010 or VS 2012 with the Windows Phone SDK installed to leverege the XNA Framework template to compile the graphics into the .xnb files to include in your Windows 8 project.

    OR

    • Visual Studio 2012 Pro/Premium/Ultimate: Use DreamSpark, MSDN or your licensed copy
    • Install MonoGame 3.0 binaries, templates, and dependencies with Windows Installer:
    Leverage the new MonoGame 3.0 Windows Installer to install the MonoGame and SharpDX libraries needed to create an XNA 4.0 project for Windows 8. This will also install two MonoGame templates for use within Visual Studio to start an XNA/MonoGame project.

    Optional: Install GitHub
    If you want to review the MonoGame Source Code or contribute code to the MonoGame project.

    Create a Git Account: https://github.com/
    Install the GitHub Windows Client: http://windows.github.com/

    Read more: T E W 

    Posted via email from Jasper-net

    Host Web Pages on Google Drive

    | Monday, December 3, 2012
    Google has added a new feature to Drive: You can now serve up web content from within your Google Drive folder, even ones that run JavaScript. All you need to do is upload your HTML files and assets (e.g., images) and make them public.

    The Google Developers site has more details on publishing a folder as a website, but essentially, besides having the folder and site assets public, you also need to link to the files in the folder using a "webViewLink" code. If you don't have an index.html file in the folder, Drive will display a list of the folder's contents.

    Read more: Lifehacker

    Posted via email from Jasper-net

    Немного об интерфейсах в .Net (по мотивам одного интервью)

    |
    В прошедний понедельник мне посчастливилось попасть на собеседование на Senior .Net Developer в одну международную компанию. Во время собеседования мне предложили пройти тест, где ряд вопросов был связан с .Net. В частности в одном из вопросов надо было дать оценку (истина/ложь) ряду утверждений, среди которых было и такое:

    В .Net любой массив элементов, например int[], по умолчанию реализует IList, что позволяет использовать его в качестве коллекции в операторе foreach.

    Быстро ответив на этот вопрос отрицательно и отдельно дописав на полях. что для foreach необходима реализация не IList, а IEnumerable, я перешел к следующему вопросу. Однако по дороге домой меня мучал вопрос: реализует ли массив все-таки этот интерфейс или нет?

    Про IList я смутно помнил, что этот интерфейс дает мне IEnumerable, индексатор и свойство Count, содержащее число элементов коллекции, а также еще пару редко используемых свойств, типа IsFixedCollection(). Массив имеет свойство Length для своего размера, а Count в IEnumerable является методом расширения от LINQ, что было бы невозможно, если бы этот метод был реализован в классе. Таким образом, получалось, что массив не мог реализовывать интерфейс IList, однако какое-то смутное чувство не давало мне покоя. Поэтому вечером после интервью я решил провести небольшое исследование.

    Класс System.Array

    Поскольку Reflector.Net у меня не был установлен, я просто написал короткую программку на С# чтобы узнать, что за интерфейсы реализуются целочисленным массивом.

    var v = new int[] { 1, 2, 3 };
    var t = v.GetType();
    var i = t.GetInterfaces();
    foreach(var tp in i)
         Console.WriteLine(tp.Name);

    Вот полный список полученных интерфейсов из окна консоли:

    ICloneable
    IList
    ICollection
    IEnumerable
    IStructuralComparable
    IStructuralEquatable
    IList`1
    ICollection`1
    IEnumerable`1
    IReadOnlyList`1
    IReadOnlyCollection`1

    ...
    ...

    Всё сразу встает на свои места, когда вспоминаешь о том, что в С# можно реализовывать интерфейсы не только 
    неявно (implicit), но и явно (explicit). Я знал об этой возможности из учебников, где приводился пример такой имплементации в случае. когда базовый класс уже содержит метод с тем же именем, что и метод интерфейса. Я также видел такую возможность в ReSharper. Однако до настоящего времени мне напрямую не приходилось сталкиваться с необходимостью явной реализации интерфейсов в моих собственных проектах.

    Сравнение явной и неявной реализации интерфейсов

    Давайте сравним эти два вида реализации интерфейсов:.

    Критерии
    Неявная (implicit) реализация
    Явная (explicit) реализация
    Базовый синтаксис
    interface ITest { void DoTest(); } public class ImplicitTest : ITest { public void DoTest() { } }

    interface ITest { void DoTest(); } public class ExplicitTest : ITest { void ITest.DoTest() { } }

    Видимость
    Неявная имплементация всегда являелся открытой (public), поэтому к методам и свойствам можно обращаться напрямую.
    var imp = new ImplicitTest(); imp.DoTest();

    Явная имплементация всегда закрыта (private). 
    Чтобы получить доступ к имплементации необходимо кастовать инстанцию класса к интерфейсу (upcast to interface).
    var exp = new ExplicitTest(); ((ITest)exp).DoTest();

    Полиморфия
    Неявная имплементация интерфейса может быть виртуальной (virtual), что позволяет переписывать эту имплементацию в классах-потомках.
    Явная имплементация всегда статична. Она не может быть переписана (override) или перекрыта (new) в классах-потомках. Прим. 1
    Абстрактный класс и реализация
    Неявная реализация может быть абстрактной и реализовываться только в классе-потомке.
    Явная реализация не может быть абстрактной, но сам класс может иметь другие абстрактные методы и сам быть абстрактным.Прим. 2

    Read more: Habrahabr.ru
    QR: Inline image 1

    Posted via email from Jasper-net

    Анатомия атаки: Как я взломал StackOverflow

    |
    Почти два года назад я наткнулся на довольно значительную уязвимость в сети сайтов StackExchange. Я говорю «наткнулся» потому, что я не пытался взломать сайт. Обстоятельства приоткрыли мне дверь. Сама уязвимость является довольно интересной, и содержит урок для всех, кто создает и занимается поддержкой сайтов или серверной инфраструктуры. Итак, вот история о том, как я взломал StackOverflow…

    Исходные данные

    В то время я работал в небольшой компании, где имелся фаервол с совершенно драконовскими ограничениями. Он резал все заголовки запросов и ответов, не соответствующие спецификации HTTP/1.1 (и даже резал валидные HTTP/1.1 заголовки). Это играло злую шутку с сайтами, которые полагаются на такие вещи, как X-Requested-With. Поэтому, для своих «внешних похождений», я настроил прокси.

    У меня было несколько серверов в то время, так что я просто поставил на одном из них Squid. Так как я кое-что соображал, я разрешил подключения к прокси только с 127.0.0.1. Я поднял SSH туннель к серверу и указал браузеру localhost в качестве прокси. Браузер подключался к туннелю, который подключался к Squid'у на сервере. Все было отлично. Кроме того, что весь мой трафик шифровался, я получил возможность нормально пользоваться сайтами.

    Для тех из вас, кто хочет мне сказать, что я поступил плохо, я хочу обратить ваше внимание на то, что у меня была возможность сделать это. И не просто возможность, мне открыто было сказано использовать прокси, так как мы должны были работать с некоторыми сайтами, которые не работали через наш фаервол. Так что я не делал ничего «неправильного».

    Атака

    В то время я часто бывал в чате StackOverflow. Тогда он еще только появился, и в нем была парочка багов. В один прекрасный день сайт начал показывать мне стек вызовов. Я не придал этому значения, так как часто встречался с этим по всему интернету. Вообще-то, почти каждый раз, когда я получал сообщение об ошибке на сайте, написанном на ASP.NET, я видел стек вызовов.

    И тут я заметил новый пункт меню в чате. Этот новый пункт меню назывался «Admin». Чисто из любопытства, я нажал на ссылку, полагая, что мне будет отказано в доступе. То, что произошло дальше, удивило меня. Я получил полный доступ ко всему. У меня была консоль разработчика, где я мог видеть кто что делает. У меня был интерфейс для работы с базой данных, где я мог напрямую запрашивать что угодно из любой базы данных. Я получил полные админские права.

    Read more: Habrahabr
    QR: Inline image 1

    Posted via email from Jasper-net

    Visual Studio 2012 Image Library - 5,000+ images downloadable now... (Think, flat "modern" images...)

    |
    The Visual Studio Image Library contains application images that appear in Microsoft Visual Studio, Microsoft Windows, the Office system and other Microsoft software.

    Visual Studio 2012 Image Library EULA.rtf, 182 KB

    VS2012 Modern Image Library.zip, 19.4 MB

    The Visual Studio Image Library contains application images that appear in Microsoft Visual Studio, Microsoft Windows, the Office system and other Microsoft software. The library of over 5,000 images can be used to create applications that look visually consistent with Microsoft software.

    ...

    The image library includes five main categories of images: Common Elements, Actions, Annotations, AppIcons and Objects. Readme files are also included in the PDF format for the Common Elements and Icon types. These readme files include information about how to use these images appropriately in your applications.

    QR: Inline image 1

    Posted via email from Jasper-net

    Understanding the Visual Tree and Logical Tree in WPF

    |
    Inline image 2

    Introduction

    This article discusses nuances of and differences between the visual tree and logical tree in WPF. It also presents a small application with which you can investigate this topic further. If you are completely unfamiliar with the concepts of the visual tree and/or logical tree, I suggest you read this page in the SDK documentation first.

    Background

    The existing documentation about the visual tree and logical tree in the Windows SDK leaves much to be desired. Ever since I started with WPF, I have felt unsure about what exactly differentiates the two. I knew that the logical tree and visual tree both only contain visual elements and controls, right? Wrong. I knew that a Window/Page/Control/etc. contains one and only one logical tree, right? Wrong. I knew what I was doing, right? Wrong.

    It turns out that the element trees in WPF are rather complicated and require detailed knowledge of low-level WPF classes to work with them correctly. Walking an element tree in a generic fashion; where you assume no knowledge of its constituents; is not as simple as it might seem. Unfortunately WPF does not publicly expose a class which simplifies walking the element trees to the point where it is "really easy".

    At this point you might be wondering what makes walking the element trees so complicated. Good question. The answer has several parts, which are discussed in the following sections.

    The Visual Tree

    The visual tree represents all of the elements in your UI which render to an output device (typically, the screen). The visual tree is used for many things like rendering, event routing, locating resources (if an element has no logical parent), and more. Walking up and down the visual tree can be a simple matter of just using VisualTreeHelper and some simple recursive methods.

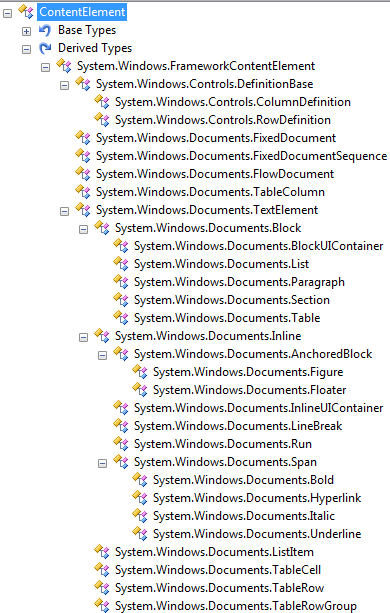
    However, there is one wrinkle which makes this a little more complicated. Anything which descends from ContentElement can appear in a user interface, but is not actually in the visual tree. WPF will "pretend" that those elements are in the visual tree, to facilitate consistent event routing, but it's just an illusion. VisualTreeHelper does not work with ContentElement objects because ContentElement does not derive from Visual or Visual3D. Here are all of the classes in the Framework which descend from ContentElement, as seen in Reflector:

    Read more: Codeproject
    QR: Inline image 1

    Posted via email from Jasper-net

    Mysterious google two step authentication - in debug

    |
    Introduction 

     I hope you have enabled your google account for two step authentication? If not -I strongly recommend to do so.  Do you know the nature of the code generated by Google Authenticator?  There are no myth here  - this is just implementation of RFC6238. And even more - you can add new level of security to your application very easy without need to use some monstrous security library. 

    I will use PHP in this article - this means that server side can use this code to validate the client one. But nothing stops you from implementing OTP generation algorythm in javascript.  

    Background 

    2-step verification drastically reduces the chances of having the personal information in your Google account stolen by someone else. Why? Because hackers would have to not only get your password and your username, they'd have to get your personal key used to generate 6 digit combination. 

    How this combination is generated? Let's move through process:

    Assume, that secret code in base32 is  GEZDGNBVGY3TQOJQGEZDGNBVGY3TQOJQ (this is actually base32 encoded secret key  12345678901234567890. 

    Why base32 and not base64 is used? My guess takes into consideration following points:

    The resulting character set is all one case (usually represented as uppercase), which can often be beneficial when using a case-insensitive filesystem, spoken speech, or human memory.
    The alphabet was selected to avoid similar-looking pairs of different symbols, so the strings can be accurately transcribed by hand. (For example, the symbol set omits the symbols for 1, 8 and zero, since they could be confused with the letters 'I', 'B', and 'O'.) 
    The result can be included in a URL without encoding any characters. 
    in other words  -  encoded message is much easier to remember than base 64.

     Variance of the code is time (to be more precise, it's 30sec intervals). Bearing in mind, that not all devices use ntp to synchronize, we might want to check 3-5 sequential codes to be sure, that right code is entered. The more secure is your solution - the less 30sec intervals you might want to check,


     Let us take current Unix Time Stamp: 

    UnixTimeStamp (time()/30): 44376117.366667 

    and calculate  HOTP - onetime password based on HMAC  (http://en.wikipedia.org/wiki/HOTP

    What do we need to calculate 6 digit code:

    Take trunc of the value above - 44376117 and convert to hex 2a52035

    Pack to byte string: 

    5(35)
     (20)
    ¥(a5)
    <(2)
     (0)
     (0)
     (0)
     (0) 

    Read more: Codeproject
    QR: Inline image 1

    Posted via email from Jasper-net

    Новое в рефлексии для .NET 4.5

    |
    .NET 4.5 включает в себя некоторые изменения к System.Reflection. Самое значительно из них это то, что Type теперь разделён на два отдельных класса: Type и TypeInfo. Объект TypeInfo хранит в себе полное определение, а сам Type теперь хранит только общие данные. Если вы используете рефлексию из вашего десктопного или веб-приложения под NET 4.5, то старое API до сих пор тоже доступно наряду с новыми методами рефлексии. Сегодня я сфокусируюсь на том, как использовать некоторые из основных функций нового API.

    Обзор Type и TypeInfo

    Класс Type обеспечивает общее проредстваление о структуре объекта. TypeInfo же представляет полное определение объекта, включая его связи с родительским и наследованными классами. Более того, API класса Type было обновлено и теперь возвращает коллекции в виде типизированных IEnumerable, а не как раньше — массивов. В случае больших и сложных сборок это позволяет читать значения результатов рефлексии по одному, а также упрощает использование метаданных типов при помощи LINQ. Приложения Windows Store имеют доступ только к этим новым IEnumerable коллекциям.

    Изменения API класса Type

    Давайте посмотрим на некоторые метаданные, которые могут быть получены из Type без использования TypeInfo, а затем погрузимся в API TypeInfo. API класса Type позволяет получать общую информацию о типах. Это означает, что вы можете получить такие метаданные как имя, пространство имён, полное имя, модуль и так далее. Это осуществляется через то же самое API как и в .NET 4.0. Например, чтобы получить полное имя и пространство имён некоторого типа, вы можете сделать следующее:

    Type stringType = typeof(string);
    string fullName = stringType.FullName;
    string stringNameSpace = stringType.Namespace;

    API TypeInfo

    Как вы видите, Type обеспечивает общее представление о структуре класса. Если вы хотите погрузиться немного глубже, то вы можете использовать новое API класса TypeInfo. Значение TypeInfo вы можете получить из Type вызовом его метода GetTypeInfo(). Возьмём, например, класс Person, который содержит в себе свойства имени (FirstName), фамилии (LastName), событие Modified и метод Save:

    public class Person 
    {
        public string FirstName { get; set; }
        public string LastName { get; set; }
        public event EventHandler Modified;
        public void Save()
        {
            // сохраняем объект в репозиторий...
        }
    }

    Теперь допустим, что вам нужно узнать какие свойства, методы и события определены в классе Person. Это можно легко узнать из TypeInfo при помощи его свойств DeclaredProperties, DeclaredMethods и DeclaredProperties:

    TypeInfo personInfo = personType.GetTypeInfo();
    IEnumerable<PropertyInfo> declaredProperties = personInfo.DeclaredProperties;
    IEnumerable<MethodInfo> declaredMethods = personInfo.DeclaredMethods;
    IEnumerable<EventInfo> declaredEvents = personInfo.DeclaredEvents;

    Другой общей задачей рефлексии является необходимость найти все типы внутри сборки. При помощи обновленного API System.Reflection, класс Assembly теперь возвращает коллекцию TypeInfo вместо массива Type. Например чтобы получить все типы определённые в выполняемой сборке, вы можете использовать свойство TypeInfo.Assembly, а затем прочитать свойство DefinedTypes на полученном объекте Assembly:

    Assembly myAssembly = this.GetType().GetTypeInfo().Assembly;
    IEnumerable<TypeInfo> myTypes = myAssembly.DefinedTypes;

    Read more: Habrahabr
    QR:  Inline image 1

    Posted via email from Jasper-net

    Quick fix for very slow to load “Downloads” folder in Windows 7 & 8

    | Sunday, December 2, 2012
    Inline image 2

    I don’t usually post “tips” but this issue has frustrated me to no end for many months and I finally found a simple but instant effective solution. It’s too good not to spread the word about.

    In the last couple of months, I started noticing that clicking the “Downloads” folders in Windows Explorer took around 15 seconds to load. This become quite annoying as I frequently access downloaded files from browsers. I tried deleting clearing out the folder but that didn’t have a lasting effect.

    After a bit of research, it turns out apparently Windows 7 (and Windows 8) tries to guess-timate what the contents of the folder are and assigns special “rules” to them to optimize the view settings and sorting.

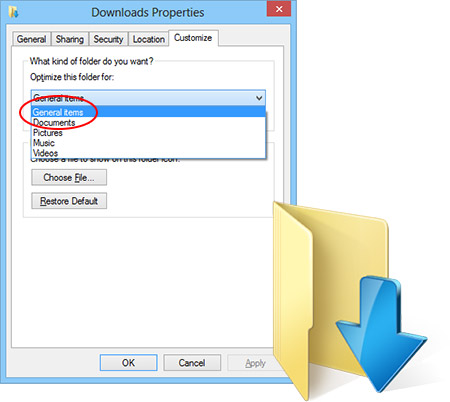
    For some reason, the “Downloads” folder likes to be categorized as a “Pictures” folder (I’m guessing because people store a lot of JPGs in it). The problem with this view is that it tries to generate thumbnails for all the files in this folder, even if they’re not pictures.

    The fix is to ensure the folder settings for “Downloads” is optimized for “General items”. This should have an instant effect (the next time you add files to the folder since the thumbnails are otherwise cached anyway).

    QR: Inline image 1

    Posted via email from Jasper-net

    .NET 4.5 Async “ConfigureAwait” – Keep the Synchronization Context in Mind

    |
    I assume you have heard about the great addition in .NET 4.5 – The Async Keyword.

    It is truly one of the key changes made to the .NET language, and it is awesome. 
    Asynchrony should be part of our code, there’s no escape from that.

    • If you write UI applications – you need asynchrony to avoid blocking the UI thread.
    • If you make I/O operations – you should use its asynchronous model that utilizes the I/O completion threads instead of occupying a worker thread.
    • If you build a service – you may want to implement the service using the asynchronous approach if you’re doing mainly I/O work.
    • If you want to parallelize your code – you may want to use the TPL and invoke operations asynchronously and in parallel.
    • And more..
    Prior to .NET 4.5, the code looks quite awful in terms of all the nested lambda expressions, error handling, and the use of the synchronization context. 
    It was also easy to make mistakes writing in this fairly complex paradigm, but I guess it comes down to the developer’s maturity and habits. I specifically got quite used to that by now, so it is all readable to me .

    In .NET 4.5, Microsoft introduced us with the new ‘async’ and the ‘await’ keywords. 
    The goal of this post isn’t to explain what it does, there are enough resources out there already that you can follow up on if you like to catch up.

    I would like to discuss a specific feature of the ‘await’ keyword, which is continuing the execution on the captured synchronization context. 

    When you write the following code -

    async void Do()
    {
        Console.WriteLine("Thread Id: {0}", Thread.CurrentThread.ManagedThreadId);
     
        await DoSomethingAsync();
        
        Console.WriteLine("Thread Id: {0}", Thread.CurrentThread.ManagedThreadId);
    }
     
    private Task DoSomethingAsync()
    {
        return Task.Run(() =>
            {
                Thread.Sleep(1000);
     
                Console.WriteLine("Thread Id: {0}", Thread.CurrentThread.ManagedThreadId);
            });
    }

    Q: What would be printed in line 7? Would it be the same as in line 3?

    QR: Inline image 1

    Posted via email from Jasper-net