This is a mirror of official site: http://jasper-net.blogspot.com/

How to get RGBA support in Ubuntu

| Thursday, July 29, 2010
RGBA stands for Red Green Blue Alpha. When applied to the computer desktop it means a whole world more. It means full-blown transparency with the ability to control the transparency like never before.

This feature was supposed to make it into Ubuntu 10.04, but because of some show-stopping issues, it was pulled. It is now slated to make it into 10.10 and, judging from how well it is working now, it will do just that.

If you're curious as to what an RGBA-enabled desktop will look like, take a gander at Figure A. This is Ubuntu 10.04 with GNOME and RGBA support installed and enabled.

RGBA%20desktop%20Fig%20A.jpg

What you will need
Outside of the necessary software, you will need a graphics card that will support full Compiz features. So if your desktop will not allow you to enable Extra features for compiz, either don't bother with this or go get a new card that will. You will also need to enable Compiz with at least Normal effects. With that set, you are ready to install.

Installation
Open up a terminal window and issue the following commands:

sudo add-apt-repository ppa:erik-b-andersen/rgba-gtk
sudo apt-get update && sudo apt-get upgrade
sudo apt-get install gnome-color-chooser gtk2-module-rgba
sudo apt-get install murrine-themes
That's it from the command line and the installation.

Read more: ZDnet

Posted via email from .NET Info

Beginner Geek: Do More With Windows 7 Sticky Notes

|
image386.png

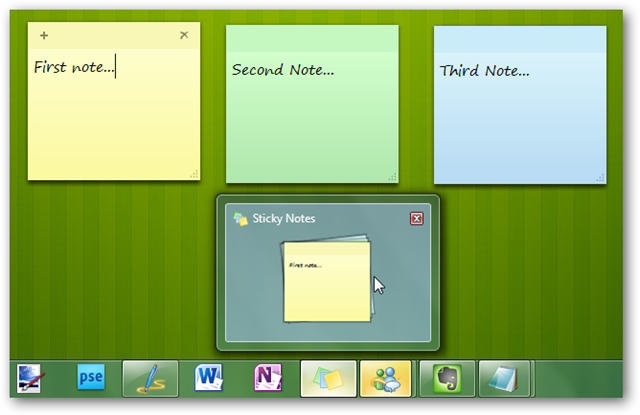
Would you like an easy way to write down a quick note and keep it in front of you without wasting a piece of a dead tree?  Let’s take a look at the Sticky Notes app in Windows 7 and how you can use it to its fullest potential.

Getting Started With Sticky Notes

If you’ve searched the Desktop Gadget Gallery for the Sticky Notes gadget from Windows Vista, you don’t have to search any more.  The Vista Gadget has been replaced in Windows 7 by the Sticky Notes application.  You’ll find it under Accessories in the start menu, or just type Sticky Notes in the Start Menu search.

Sticky Notes are great for jotting down some quick text you need to remember, like an address you receive over the phone or the items you need to pick up from the store on the way home.  Here’s how a default note looks: yellow with 11 point Segoe Print font.

Read more: How-to-geek

Posted via email from .NET Info

Robot Theme, inspired by Android™

|
Chrome theme

1?hl=en

Posted via email from .NET Info

Introducing IIS Express

|
Developers today build and test ASP.NET sites and applications using one of two web-servers:

The ASP.NET Development Server that comes built-into Visual Studio
The IIS Web Server that comes built-into Windows
Both of the above options have their pros and cons, and many ASP.NET developers have told us: “I wish I could have the ease of use of the ASP.NET Development Server, but still have all the power and features of IIS”.  Today I’m happy to announce a new, free option that we are enabling – IIS Express - that combines the best characteristics of both, and which will make it easier to build and run ASP.NET sites and applications.

IIS Express will work with VS 2010 and Visual Web Developer 2010 Express, will run on Windows XP and higher systems, does not require an administrator account, and does not require any code changes to use.  You will be able to take advantage of it with all types of ASP.NET applications, and it enables you to develop using a full IIS 7.x feature-set.

How Things Work Today

Before I get into the details of IIS Express, let’s first quickly review how the ASP.NET Development Server and IIS options work today.

ASP.NET Development Server

Visual Studio’s built-in ASP.NET Development Server (also known as “Cassini”) has the benefit of being light-weight and easy to quickly run.  It doesn’t listen on remote ports (which makes it easier to get approved for many corporate security environments), works even when you are running under a non-administrator account, and doesn’t require a separate installation step.

The fact that it is so easy to get running is a huge positive of it – and the reason it is the default web-server used by ASP.NET projects in Visual Studio when you press F5 to run them:

image_thumb_5E43B094.png

IIS Express – The Best of Both Options

We have been working on a new flavor of IIS 7.x that is optimized for developer scenarios that we are calling “IIS Express”. We think it combines the ease of use of the ASP.NET Web Server with the full power of IIS.  Specifically:

It’s lightweight and easy to install (less than 10Mb download and a super quick install)
It does not require an administrator account to run/debug applications from Visual Studio
It enables a full web-server feature set – including SSL, URL Rewrite, Media Support, and all other IIS 7.x modules
It supports and enables the same extensibility model and web.config file settings that IIS 7.x support
It can be installed side-by-side with the full IIS web server as well as the ASP.NET Development Server (they do not conflict at all)
It works on Windows XP and higher operating systems – giving you a full IIS 7.x developer feature-set on all OS platforms
IIS Express (like the ASP.NET Development Server) can be quickly launched to run a site from a directory on disk.  It does not require any registration/configuration steps. This makes it really easy to launch and run for development scenarios.

image_thumb_7118343E.png

Read more: ScottGu's Blog
Read more: IIS Express

Posted via email from .NET Info

dm-crypt: a device-mapper crypto target

|
About

Device-mapper is a new infrastructure in the Linux 2.6 kernel that provides a generic way to create virtual layers of block devices that can do different things on top of real block devices like striping, concatenation, mirroring, snapshotting, etc... The device-mapper is used by the LVM2 and EVMS 2.x tools.
dm-crypt is such a device-mapper target that provides transparent encryption of block devices using the new Linux 2.6 cryptoapi. The user can basically specify one of the symmetric ciphers, a key (of any allowed size), an iv generation mode and then the user can create a new block device in /dev. Writes to this device will be encrypted and reads decrypted. You can mount your filesystem on it as usual. But without the key you can't access your data.
It does basically the same as cryptoloop only that it's a much cleaner code and better suits the need of a block device and has a more flexible configuration interface. The on-disk format is also compatible. In the future you will be able to specify other iv generation modes for enhanced security (you'll have to reencrypt your filesystem though).
I've set up a Wiki.
There's a mailing list at dm-crypt@saout.de. If you want to subscribe, use the mailman web interface or its archive.
Gmane provides a NNTP interface and also a web archive for this mailing list.

Download

There is support for dm-crypt in the latest official kernel 2.6.4 which you can find on kernel.org. Please use the mirrors for downloads.
There is a HIGHMEM cryptoapi bug in kernels before 2.6.4-rc2, please upgrade if you were using such a kernel.
The latest version of the native userspace setup tool is cryptsetup 0.1.
Clemens Fruhwirth is maintaining an enhanced version of cryptsetup with the LUKS extension that allows you to have an on-disk block of metadata which is superior to the current mechanism and was my long term plan anyway but I didn't find the time to implement that yet...

Read more: dm-crypt

Read more: Wikipedia

Posted via email from .NET Info

Ubuntu Tweak

|
logo.png

Introduction

Ubuntu Tweak is an application designed to config Ubuntu easier for everyone. It provides many useful desktop and system options that the default desktop environment doesn't provide. At present, it's only designed for the Ubuntu GNOME Desktop, and always follows the newest Ubuntu distribution.

LICENSE

Ubuntu Tweak is a free software, which means you can redistribute it and/or modify it under the terms of the GNU General Public License published by the Free Software Foundation. More information can be seen in the package's LICENSE file.


Features of Ubuntu Tweak

  • View of Basic System Information(Distribution, Kernel, CPU, Memory, etc.)
  • GNOME Session Control
  • Auto Start Program Control
  • Quick install popular applications
  • A lot of third-party sources to keep applications up-to-date
  • Clean unneeded packages or cache to free disk space
  • Show/Hide and Change Splash screen
  • Show/Hide desktop icons or Mounted Volumes
  • Show/Hide/Rename Computer, Home, Trash or Network icon
  • Tweak Metacity Window Manager's style and behaviour
  • Compiz Fusion settings, Screen Edge Settings, Window Effect Settings, Menu Effect Settings
  • Set the Shortcuts to archive quicker access your favourite applications
  • GNOME Panel Settings
  • Nautilus Settings
  • Advanced Power Management Settings
  • System Security Settings
  • And many other in process...

Read more: Ubuntu Tweak

Posted via email from .NET Info

Open Source GSM Cracking Software Released

|
The GSM technology used by the majority of the world's mobile phones will get some scrutiny at next week's Black Hat security conference. An open source effort to develop GSM-cracking software has released software that cracks the A5/1 encryption algorithm used by some GSM networks. Called Kraken, this software uses new, very efficient, encryption cracking tables that allow it to break A5/1 encryption much faster than before.

Read more: Slashdot

Posted via email from .NET Info

Think Notepad only opens files? Nope! File/Open a HTTP URL (and get the HTML response) in Notepad…

|
Just learned this today via JoshEinstein.com - Quick Tip – Troubleshoot broken OData response using Notepad…

Did you know you can “open” a URL in Notepad?

Posted via email from .NET Info

MSBuild Known Issues

|
Since the release of Visual Studio 2010 we have received a few reports of crashing behavior which can be traced back to issues with MSBuild.  We’ve analyzed all of these and there are several particular cases where a crash can occur.  We’ve also added a notification to Windows Error Reporting to help guide those who hit these errors.  You can determine you your error is one of these either by matching the problem description below, or looking in the Event Viewer as follows:

Open the Event Viewer
Search for Information events with ID = 1001 and Source = Windows Error Reporting.  Look for those with the time that approximately matches when you saw the crash.
At the top of the details pane for the event is text that would look like the below.  If the bucket number is not 1055654512, then this post may not apply to you.
Fault bucket 1055654512, type 1

Event Name: APPCRASH

Response: xxxxxxx

Cab Id: 0

Crash when debugging using F5

Problem: This can occur if the build process is missing a required target.  This is normally due to an improperly customized build process.  If you are using the .NET MicroFramework 4, which is not supported in Visual Studio 2010, you may also see this issue.

Solution: Provide the missing target.  Try building the project/solution on the command-line.  If MSBuild logs an error that a target is missing, that could be the problem.

Crash when registering COM component

Problem: COM registration requires the user have permission to certain registry keys, and lacking that permission the RegASM task crashes.

Read more: The Visual Studio Blog

Posted via email from .NET Info

Building Wave Gadgets with GWT

|
Hilbrand Bouwkamp is an independent internet developer/trainer/presenter specialized in RIA, GWT and Android. He has been following GWT and Wave since it's first release and has created two open source libraries related to GWT and Wave: cobogw and cobogwave.This blogpost is about the cobogwave library.
As soon as Google Wave was released and I had an account, I wanted to write a Wave Gadget. I believe Gadgets are one of the strengths of Wave because they let you add a structured component to an unstructured communication flow to make things more efficient. For example, a simple date picker Gadget can be added to an event-planning wave, and instead of people having to go to a separate site and communicate their date preferences manually, they can do the date-selection in the wave, and all of the information is stored in a single place. There are many situations like this where gadgets can add structure and keep related information together.
Since the Google Wave client itself is build with GWT (Google Web Toolkit), I thought it to be natural to write a Gadget with GWT. To do that, I needed to wrap the Wave Gadgets JavaScript API with my own GWT JSNI wrapper. Like other GWT gadget developers, I wrote my own wrapper - but I wanted to do it in a way that other developers could benefit from. So, I made sure that my wrapper included all of the Wave Gadgets API functionality, I wrote documentation for it, and I open-sourced it under the Apache 2 license as the cobogwave library. Now, other developers can skip the wrapper-writing step and simply focus on writing their gadget.
The cobogwave library makes it very easy to build gadgets for Wave. Just like the iGoogle GWT Gadgets API library, it defines a Needs interface: NeedsWave. By implementing the interface, you can make your gadget code Wave-enabled. Or, you can simply extend the WaveGadget class for the same effect.
GWT developers are accustomed to work with handlers, so the cobogwave library provides much of its functionality via handlers. For example, you can register for the ModeChangeEvent to be notified when the user changes from playback to edit mode, ParticipantUpdateEvent when a new user is added or removed to the wave, and StateUpdateEvent when the gadget receives a new state. The cobogwave library also has support for experimental functionallity in the Wave Gadget library, like the Wave UI Widgets Button, Frame and Dialog.
Recently, I was involved in the latest release of the gadgets support in the Google API Libraries for GWT. In the new version, it's much easier to implement RPC calls to your own server, and this method also works for Wave Gadgets.

Read more: Google Wave Developer Blog

Posted via email from .NET Info

How about a generic API that hooks your Web app to different social networks? How about the “Web Application Toolkit for Social Network APIs”! (C# and VB)

|
As social networking Web sites are becoming more and more popular, users often want to access simultaneously the different networks they belong to from one only entry point. For example, one user might want to post the same message they are posting on your site also on Facebook, Twitter, MySpace and so on.

Although many of these social networks provide APIs for accessing their information, you might want to integrate your Web application with several social sites at the same time and be able to do this in a consistent manner, without having to go into numerous modifications in your code with each new social network that you want to incorporate.

This Web Application Toolkit provides a generic “Social Networks” API that allows connecting your Web application with different social networks and managing them through one entry point with a consistent set of methods. In the Toolkit you’ll find examples of how to use the Social Networks API provided to connect a Web application with Facebook and Twitter, allowing you to manage the data provided by these networks in a generic way.

Please notice that this Toolkit includes examples only for reduced set of operations (mainly posting status updates) within the two social networks named before. Through this documentation you’ll find instructions on how to extend this set into more operations and more social networks.

Read more: Greg's Cool [Insert Clever Name] of the Day

Posted via email from .NET Info

Serialization in C# .NET II - XML Serialization

|
Abstract

Serialization in C# .NET plays a key role in various functions, such as remoting. Developers may often need to perform custom serialization in order to have complete control over the serialization and deserialization processes. Binary .NET serialization processes may not be enough to deserialize an input in one platform with serialized output from another. In the second article of this series, Anupam Banerji explains XML serialization, schemas, and provides an example of XML serialization.

Introduction

XML serialization is a method of storing object states in a portable, human-readable format. An XML serialized object can be deserialized by any platform, and not just the .NET platform as required by an object serialized in the .NET binary format. XML serialization can also be standardized using an XML schema. This allows serialization for business processes that operate across multiple operating systems, platforms, or have multiple development parties.

XML serialization has a few disadvantages when compared to binary serialization. The object itself is serialized, not the entire object graph. Another disadvantage is that only public fields may be serialized. Therefore, object design requires a careful consideration of XML serialization. The advantages of XML serialization should be a decisive factor in the integration of XML serialization in object design and implementation.

(De)Serializing an Object

Serialization is performed by instancing an XmlSerializer object. The serialized output is written to an underlying stream object. This is identical to the process used in binary serialization. The deserialized object should be cast into the original data type (a generic object type is returned upon deserialization).

The code below serializes a double:

using System.Xml.Serialization;
using System.IO;

XmlSerializer xs = new XmlSerializer(typeof(double));
FileStream fs = new FileStream(, FileMode.Create);

xs.Serialize(fs, (double)(10));
fs.Close();
The file contains XML output with the object state in a node:

<?xml version="1.0"?>

<double>10</double>

To deserialize an object back into the original data type (notice the cast):

double d = (double)xs.Deserialize(fs);

One of the drawbacks of using the XML serializer is that it writes only one object state to the output rather than multiple object states. This is similar to the binary serializer. I don’t necessarily agree with Microsoft® on the implementation of the Serialize() method; a large number of files are needed to serialize a large number of objects. The other issue is that deserialization of the object cannot be implemented without reading the contents of the correct object into the underlying stream, even if multiple object states were written to a single file.

A class may also be serialized. The class and serialized members must be marked as public. The class must also have a parameterless constructor; this may be overloaded. The [Serializable] attribute does not have to be applied to the class, unlike binary serialization. Private and protected members are ignored, and any inherited fields are not serialized.

(De)Serializing a DataSet

An DataSet object may also be (de)serialized using the XmlSerializer object. There are two methods to accomplish this.

The Developer can choose to implement the method to (de)serialize an object after instancing a DataSet object and populating it. The second method is to use DataSet methods.

Read more: Codeproject

Posted via email from .NET Info

Debugging an OOB Silverlight Business Application

|
Recently, we came across a bug with the Silverlight Business Application with respect to an Out of Browser application. In the RTM bits for Silverlight 4 Tools a new feature was added to enable a better debugging experience with Out of Browser application. The feature basically launched the app in OOB window when run with the debugger attached. If you have tried that with the business application template, you will notice that the app does not run. It crashes with an exception, that the URI path is not valid.

We realize this is an issue most folks are running into and we have fixed this template and we are looking ways to get you access to it. However, there is a relatively easy workaround to fix this issue.

The steps involved are :-

Create a new or open up an existing application that was created using the BusinessApplicationTemplate
Once the project is open, go to the Project Properties page for the Silverlight Application.
In that, first uncheck the OOB option which is enabled by default

Read more: @deepeshm

Posted via email from .NET Info

Google App Engine: The Ultimate List Of Resources

|

Skype's Cryptography Reverse-Engineered

|
Someone claims to have reverse-engineered Skype's proprietary encryption protocols, and has published pieces of it.
If the crypto is good, this is less of a big deal than you might think. Good cryptography is designed to be made public; it's only for business reasons that it remains secret.

Read more: Bruce Schneier

Posted via email from .NET Info

How to Create a Silverlight OOB Installer Wrapper UI Library?

|
Before starting with the next part of the discussion, let me ask you some questions. Are you a Silverlight developer? If “Yes”, how many times you create a Silverlight Out-of-Browser application? For that, how many times you create an UI and write code to instruct the user to install the application as OOB application. I think the answer will be “Many Times”

To solve this, we will create a Custom UI Wrapper (like the above snapshot) which will have all the codes necessary to guide the user. Once this is done, we don’t have to write the same installation code again and again over the applications. Read through the description and don’t forget to leave your comments and suggestions.

Background

For last couple of months I created so many Silverlight out of browser application where I didn’t add any instruction for the user to install it outside the browser window. Myself faced difficulty creating an UI each time and also write the same code over and over to do it in my demos.

Hence, this time I decided to create a Wrapper Control, which I can use in all of my Silverlight Out-of-Browser applications without doing much design or any code. I found it very useful and decided to share with you, so that, you can also take the same approach in your applications.

Prerequisite

Here is the prerequisite for starting with the project:

Visual Studio 2008 or Visual Studio 2010
Silverlight 3 Tools for Visual Studio 2008 SP1 or Silverlight 4 Tools for Visual Studio 2010
Expression Blend 3 or Expression Blend 4 (for designing)
Remember that, you can develop Silverlight 4 application only in Visual Studio 2010, where as Silverlight 3 is supported in both Visual Studio 2008 SP1 and Visual Studio 2010. I am using Visual Studio 2010 and Silverlight 4 for the demonstration. So, the source code attached here will only run in Silverlight 4 & Visual Studio 2010 environment.

Setting up Project

Once you set up your development environment, create a Silverlight project. If you are new to Silverlight application development and want to know about Silverlight and want to learn how to create a new Silverlight application in-depth, read the Silverlight Tutorial.

Open your Visual Studio 2010 IDE
Select File > New Project or just press CTRL + SHIFT + N to open up the New Project dialog
Expand the “Visual C#” node and then go to sub node “Silverlight”
Select “Silverlight Class Library” from the right pane

Read more: Codeproject

Posted via email from .NET Info

Uploading a File (Or Files) With ASP.NET MVC

|
I wanted to confirm something about how to upload a file or set of files with ASP.NET MVC and the first search result for the phrase “uploading a file with asp.net mvc” is Scott Hanselman’s blog post on the topic.
His blog post is very thorough and helps provide a great understanding of what’s happening under the hood. The only complaint I have is that the code could be much simpler since we’ve made improvements to the ASP.NET MVC 2. I write this blog post in the quixotic hopes of knocking his post from the #1 spot.
Uploading a single file
Let’s start with the view. Here’s a form that will post back to the current action.

<form action="" method="post" enctype="multipart/form-data">
 
 <label for="file">Filename:</label>
 <input type="file" name="file" id="file" />

 <input type="submit" />
</form>

Here’s the action method that this view will post to which saves the file into a directory in the App_Data folder named “uploads”.

[HttpPost]
public ActionResult Index(HttpPostedFileBase file) {
           
 if (file.ContentLength > 0) {
   var fileName = Path.GetFileName(file.FileName);
   var path = Path.Combine(Server.MapPath("~/App_Data/uploads"), fileName);
   file.SaveAs(path);
 }
           
 return RedirectToAction("Index");
}

Notice that the argument to the action method is an instance of HttpPostedFileBase. ASP.NET MVC 2 introduces a new value providers feature which I’ve covered before.
Whereas model binders are used to bind incoming data to an object model, value providers provide an abstraction for the incoming data itself.

Read more: Haacked

Posted via email from .NET Info

Converting from webforms to MVC presentation?

|
I just posted the video from the Community for MVC presentation by Matt Hawley about how Codeplex has been converting the site from ASP.Net Webforms to ASP.Net MVC .

Read more: LosTechies.com
Read more: Video

Posted via email from .NET Info

Windows Authentication

|
In this article we will cover Windows Authentication.

Contents

Definitions of few keywords to understand Windows Authentication.
What is Windows Authentication.
Why Windows Authentication.
How Windows Authentication is implemented in ASP.NET Application.
Configuring impersonation in an application.
Authentication: Authentication is the process of determining the identity of a user based on the user’s credentials. The user’s credentials are usually in the form of user ID and password, which is checked against any credentials' store such as database. If the credentials provided by the user are valid, then the user is considered an authenticated user.

Authorization: After successful authentication, deciding which resources a user can access based on their identity and checking whether the authenticated user has sufficient rights to access the requested resource is authorization.

Impersonation: Impersonation is a process in which user accesses the resources(Ex:Files,DB…) by using the identity of another user.

Ex: If anonymous(not logged in/not Authenticated) access is enabled for a website in IIS, then IIS runs all the users' requests using the identity of the IUSR_machinename account, which is created by IIS. This is the default option in IIS.

WindowsIdentity: It represents the current Windows User.

Authentication Providers

In ASP.NET authentication is done by both IIS and ASP.NET. ASP.NET implements authentication through authentication providers that contains the code necessary to authenticate the requestor's credentials. There are three types of authentication providers built into ASP.NET. They are:

Windows Authentication Provider.
Forms Authentication Provider.
Passport Authentication Provider.
Windows Authentication Provider: Provides information on how to use Windows authentication in conjunction with Microsoft Internet Information Services (IIS) authentication to secure ASP.NET applications.

Why Windows Authentication:

Windows authentication is generally used if the users accessing the application belong to same organization.
This authentication method uses Windows accounts for validating users' credentials. This type of authentication is very good for intranet Web sites where we know our users.
How Windows Authentication is Implemented in ASP.NET Application

With this type of authentication, initially IIS performs the authentication through one of its authentication options (e.g., basic, digest, Integrated Windows, or some combination of them). After successful authentication, IIS passes the credentials of the authenticated user to the ASP.NET thread. Selection of appropriate identity for the ASP.NET worker thread is performed by using the process defined under the ASP.NET Impersonation section. Based on the credentials supplied by IIS, windows identity is created by WindowsAuthenticationModule module in ASP.NET. This identity is set as current user identity (setting the security information for the current HTTP request)for the application. This is the default authentication mode in ASP.NET and it is set in web.config file of the application using below code:

<system.web>
 <authentication mode="Windows"/>
</system.web>

Although the Windows Authentication mode sets the value of the current User property to a WindowsIdentity based on the credentials supplied by IIS. The Windows identity supplied to the operating system used for permission checking, such as NTFS file permissions, or for connecting to a database using integrated security is the identity of the ASP.NET process. On Microsoft Windows 2000 and Windows XP Professional, this is the identity of the ASP.NET worker process, which is the local ASPNET account. On Windows Server 2003, this is the identity of the IIS Application Pool that the ASP.NET application is part of. Which is the NETWORK SERVICE account.

Read more: Codeproject

Posted via email from .NET Info

Applying MVC Pattern to web services

|
Web services can be invoked statically using a WSDL service interface and service implementation documents, or dynamically by retrieving the service type definitions and the service implementation via UDDI. But until now, you couldn’t do both at the same time. You can now do this using the Model View Controller pattern (or MVC); this architecture supports both dynamic and static Web services. This article is primarily a design exercise and assumes that you know about design patterns and the MVC system. Please look to the resources to learn more about MVC.
The MVC paradigm is a way of breaking an application, or even just a piece of an application’s interface, into three parts: the model, the view, and the controller.
The model represents enterprise data and the business rules that govern access to and updates of this data. Often the model serves as a software approximation to a real-world process, so simple real-world modeling techniques apply when defining the model.
A view renders the contents of a model. It accesses enterprise data through the model and specifies how that data should be presented. It is the view’s responsibility to maintain consistency in its presentation when the model changes. This can be achieved by using a push model, where the view registers itself with the model for change notifications, or a pull model, where the view is responsible for calling the model when it needs to retrieve the most current data.
A controller translates interactions with the view into actions to be performed by the model. In a stand-alone GUI client, user interactions could be button clicks or menu selections, whereas in a Web application, they appear as GET and POST HTTP requests. The actions performed by the model include activating business processes or changing the state of the model. Based on the user interactions and the outcome of the model actions, the controller responds by selecting an appropriate view.

Read more: Naveenbalani.com

Posted via email from .NET Info

IKVM.NET 0.44 Release Candidate 2

|
A new release candidate with two bug fixes.

Changes:

Changed version to 0.44.0.2
Fixed Field.set() bug #3033769.
When a protected or public member is accessed in a non-public base class in another assembly that is simultaneously compiled, we need to add an InternalsVisibleTo to the callee assembly for the caller assembly.

Read more: IKVM weblog

Posted via email from .NET Info

A tutorial on Remote Procedure Calls (RPCs) in Google Web Toolkit

|
At some point in your GWT development, you’ll want to start communicating with a server. Handily, GWT has a lot of stuff built in to help you do this in as easy a way as possible. The GWT RPC framework is very helpful indeed for just this, and this post will show you how to create your RPC services easily.

The basics:
GWT is divided into “client-side” and “server-side” interaction. “Client-side” is what’s done by the browser, and “server-side” is obviously what’s being done by the server. Server-side is what can’t or shouldn’t be done in the browser. It helps to think of the client-side as the frontend and the server-side as the backend, though this isn’t always the correct view to take.
GWT-RPC is essentially very easy client-server interaction. Create a few interfaces, edit an xml file, write a little code, done. Client-side code will be compiled by GWT into Javascript, and server-side code will be compiled into Java bytecode, meaning that you’re programming pure Java on the server-side, so you can use all kinds of native Java libraries that you couldn’t otherwise.

How to build a service into your GWT app:
This is a somewhat long one, so make yourself a cup (or seven cups) of coffee. Here’s the code for this tutorial, if you feel like just looking at code.
Make sure before you do this that you’re set up properly, with a blank project as detailed in this tutorial. However, the example that’s created by default makes use of RPCs, so if you just want a rough idea on how it works, have a look at that.
Alright, let’s get going.

First, let’s create the client-side interface to our service which lists all the RPC methods.
Right-click ie.flax.RPCTutorial.client (in my case) and select “New -> Interface”.

Read more: Flax

Posted via email from .NET Info

CAST vs CONVERT

|
Both these functions are used to convert values from one datatype to another
But there are some differences between them

1 CAST is ANSI standard and CONVERT is specific to SQL Server
2 CAST can't be used for formating purposes.
But CONVERT can be used for formating purposes particularly on datetime and money datatype

declare @d datetime
set @d='20001210 12:34:22'
select convert(varchar(10),@d,108)
declare @m money
set @m=23498
select convert(varchar(10),@m,1)

Read more: Beyond Relational

Posted via email from .NET Info

More Tools to Work with MySQL Databases in Visual Studio Provided by dbForge Fusion!

|
Devart today releases dbForge Fusion for MySQL, v4.50 - a powerful add-in designed to simplify MySQL database development and enhance data management capabilities.

With dbForge Fusion, Devart continues its initiative to produce efficient database experiences for all the people in MySQL world.

New features in dbForge Fusion for MySQL, v4.50 include:

Support of MS Visual Studio 2010
Now all the tools of dbForge Fusion for MySQL are available in MS Visual Studio 2010.
More freedom for backing up schemas Schema Export wizard has been totally redesigned to Database Backup to enable users to back up schemas in automatic mode using Windows task scheduler, save backup options for future use, view automatically complied log file. Besides, old backup files are automatically removed based on date or quantity.
New tool for database developers - Query Profiler
dbForge Fusion offers results of internal MySQL tools like SHOW PROFILE and EXPLAIN in a convenient and clear GUI. Besides, you get STATUS variables for the required query automatically calculated.
Additional benefits:

Plan of the query displayed in the tree view for easy review
Profiling history that can be saved for further analysis
Capability to compare profiling results in two clicks
Capability to print profiling results
Data comparison and synchronization of any databases
Diverse testing and close interaction with database developers, admins and casual users resulted in thoughtful redesign and enhancement of Data Comparison tool. Now it compares and synchronizes database of any length with significant performance improvement. To customize comparison and synchronization, the users can use new options, change synchronization direction in one click, and quickly filter tables in comparison results. An additional benefit is generating accurate comparison reports in HTML and Excel formats.
Advanced query building
Now Query Builder, a powerful tool for visual query creating, is tailored for creating complex conditions with several clicks. The new power is based on optimized performance of the Selection tab in the expression editor, visual addition of subqueries to any part of the main query, new Wrap to Subquery option to wrap tables into a subquery, optimized navigation in the editor, particularly between subqueries and other features.
Quick generating template SQL scripts for database objects
Thanks to this new functionality, you can save your time while working with database objects. For example, you can quickly generate template SQL scripts CREATE, DROP, SELECT, INSERT, UPDATE or DELETE scripts for tables. This option is available in the context menu of Database Explorer and called ‘Generate Script As’.
Improved schema comparison
Extended capabilities of Schema Comparison wizard
New comparison options to ignore some table options, DEFINER and SQL SECURITY expressions, default values for columns

Read more: ASP .NET Forum
Read more: dbForge Fusion for MySQL

Posted via email from .NET Info

CryptoAPI and 5 bytes exponent public keys

|
One customer of mine wanted to import a public key he got from a partner. That public key had a 2048 bits modulus and a 5 bytes exponent.

The problem was that CryptoAPI's RSAPUBKEY structure doesn't allow a 5 bytes exponent because it defines the public exponent with a DWORD (4 bytes max):

typedef struct _RSAPUBKEY {
DWORD               magic ;
DWORD               bitlen ;
DWORD               pubexp ;
} RSAPUBKEY;

CryptoAPI only supports 4 byte exponents with MS CSPs (Cryptographic Service Providers). CNG overcomes this limitation on Vista and later:

Key Storage and Retrieval
"
CNG is more flexible with regard to RSA key pairs. For example, CNG supports public exponents larger than 32-bits in length, and it supports keys in which p and q are different lengths.
"

Please, note that the restriction of 4 byte exponents are for MS CSPs only. CryptoAPI should be able to work with 5 byte exponents if using a third-party CSP.

Read more: Decrypt my World

Posted via email from .NET Info

Database internal file versions– How to determine if the database was upgraded or created from scratch

|
In some cases it it interesting to know whether a database was directly created on the current version of the running SQL Server instance or if the database was upgraded during an upgrade of the instance or by attaching a database from an older version to a newer version of SQL Server.

The information is stored in the datafile headers. To reveal it you will have to use the DBCC command and redirect the information to the trace output (by default this will be send to the errorlog) by using the following command:

DBCC TRACEON(3604)

After that you free to use one of the following commands:

DBCC DBINFO (information of the current database you are executing from)
DBCC PAGE(‘YourDatabaseHere’1,9,3) (Whereas “YourDatabaseHere’1” is you database to check for)
to will get you the following information:

1346.clip_5F00_image002_5F00_thumb.jpg

Read more: Developer hearted / Relational minded

Posted via email from .NET Info

How to request an smartcard logon cert programmatically (C#)

|
Hi all,

The other day I created this C# sample which shows how to request an smartcard logon cert to a CA. It is based on this other sample: How to create a certificate request with CertEnroll and .NET (C#).

using System;
using System.Collections.Generic;
using System.ComponentModel;
using System.Data;
using System.Drawing;
using System.Text;
using System.Windows.Forms;

//  Add the CertEnroll namespace
using CERTENROLLLib;
using CERTCLIENTLib;

namespace CATest
{
   public partial class Form1 : Form
   {
       private const int CC_DEFAULTCONFIG = 0;
       private const int CC_UIPICKCONFIG = 0x1;
       private const int CR_IN_BASE64 = 0x1;
       private const int CR_IN_FORMATANY = 0;
       private const int CR_IN_PKCS10 = 0x100;
       private const int CR_DISP_ISSUED = 0x3;
       private const int CR_DISP_UNDER_SUBMISSION = 0x5;
       private const int CR_OUT_BASE64 = 0x1;
       private const int CR_OUT_CHAIN = 0x100;

       public Form1()
       {
           InitializeComponent();
       }

       // Create request
       private void createRequestButton_Click(object sender, EventArgs e)
       {
           //  Create all the objects that will be required
           CX509CertificateRequestPkcs10 objPkcs10 = new CX509CertificateRequestPkcs10Class();
           CX509PrivateKey objPrivateKey = new CX509PrivateKeyClass();
           CCspInformations objCSPs = new CCspInformationsClass();
           CX500DistinguishedName objDN = new CX500DistinguishedNameClass();
           CX509Enrollment objEnroll = new CX509EnrollmentClass();
           CObjectIds objObjectIds = new CObjectIdsClass();
           CObjectId objObjectId = new CObjectIdClass();
           CX509ExtensionKeyUsage objExtensionKeyUsage = new CX509ExtensionKeyUsageClass();
           CX509ExtensionEnhancedKeyUsage objX509ExtensionEnhancedKeyUsage = new CX509ExtensionEnhancedKeyUsageClass();
           CX509ExtensionTemplateName objExtensionTemplate = new CX509ExtensionTemplateName();
           string strRequest;

           try
           {
               requestText.Text = "";

Read more: Decrypt my World

Posted via email from .NET Info

Silverlight and WebSockets

|
I was intrigued by this post from Tomek which has links to a prototype of an application built with Silverlight but using WebSockets.

It’s kind of interesting because running the application in IE9 gives me;

image_thumb.png

because Chrome has support for WebSockets already and so the sample switches out the Silverlight functionality.

If you’ve not read about WebSockets then there’s a starter here and info on the protocol up here.

If you’ve programmed with connected, TCP sockets then you know that the model is essentially;

Server listens. Client connects.
Connection stays open during lifetime of communication.
Client and Server send stuff any time they like in a full-duplex manner.
So, traditional sockets are great in that they allow full duplex comms such as when the server wants to notify the client that something has happened but they’re not so great in that they require an open connection which tends to limit your server side scalability. They’re also not so great when it comes to crossing boundaries that only allow HTTP on port 80 or 443.

If you’ve programmed with HTTP then you know that the model is essentially;

Server listens. Client connects.
Client sends request.
Server sends response.
Client (generally) disconnects as soon as that response comes back.
and so HTTP is a great use of sockets in that it makes the model a lot more scalable by not requiring a permanent connection between the client and the server and server-side state but, because of that lack of connection, you can’t have the server notify the client of something because, generally, the client and server have no connection at any particular point in time.

Now, of course you can use HTTP in various ways to try and give the illusion that the server does have a connection to the client and that’s normally done by just having the client poll the server on some period essentially asking “Do you have anything for me right now?” with the expectation that the answer from the server will frequently be “no”.

So, a server wanting to “notify” a client simply has to put its notification data into a database and wait for the next time that client polls when it will be able to deliver the notification.


Read more: Mike Taulty's Blog

Posted via email from .NET Info

Sidebar that Silverlight - VB Project Template to help build Silverlight based Windows Sidebar Gadgets

|
There’s something about using Silverlight for a Sidebar gadget that appeals to me. Then there’s the fact that, with Win7’s success, sidebar gadgets are now getting more usage. And finally there’s the general uptick happening with Silverlight itself.  So we mash all these together and get…?

Yes, there’s also a C# template too, Silverlight Sidebar Gadget (C#)

Read more: Greg's Cool [Insert Clever Name] of the Day
Read more: C# Template

Posted via email from .NET Info

How to compile OpenJDK on Ubuntu

|
OpenJDK Overview
OpenJDK is the open source implementation of Java. OpenJDK is under version control by a distributed version control system called Mercurial . This guide will describe how to install Mercurial, download the source code of OpenJDK and how to compile OpenJDK.

Install Mercurial and Extensions
You first need to make sure Mercurial is installed on your system.

sudo apt-get install mercurial

In addition to standard Mercurial you also need the Forest Extension. These are currently not packages for Ubuntu, see Bug report

You can get the forest extension via the following command. This will create the directory hgforest with the file "forest.py".

# close the forest extensions
# if the url below does not work you find alternative url via
# http://bitbucket.org/repo/all?name=hgforest
hg clone https://vogella@bitbucket.org/vogella/hgforest-crew

Edit the file "~/.hgrc" (i.e. the mercurial configuration file) to include the lines.

[extensions]
forest=/home/vogella/hgforest/forest.py

After this change you should be able to use commands such as 'fclone' and 'fpull' is you type in "hg" in the command line.

Read more: Lars Vogel

Posted via email from .NET Info

Implementing a Basic Hello World WCF Service

|
Introduction

In this article, we will manually implement a basic WCF service from scratch, step by step with clear instructions and precise screen snapshots. You will have a thorough understanding of what WCF is under the hood after you read this article. Visual Studio 2010 under Windows 7 will be used for all screenshots of this article.

We will build the WCF service manually from scratch, meaning we will not use any Visual Studio 2010 template to create the service. We will also create the host application and the test client application manually, including generating the proxy and configuration files manually with the tool svcutils.exe. In your real project, you can and should utilize Visual Studio 2010 to help with these tasks, but manually doing the actual work is a great way for you to understand what WCF is really like under the hood. This will help you to better understand the why of those WCF templates within Visual Studio.

We will build a HelloWorld WCF service by carrying out the following steps:
• Create the solution and project
• Create the WCF service contract interface
• Implement the WCF service
• Host the WCF service in the ASP.NET Development Server
• Create a client application to consume this WCF service

Creating the HelloWorld solution and project

Before we can build the WCF service, we need to create a solution for our service projects. We also need a directory in which to save all the files. Throughout this book, we will save our project source codes in the C:\SOAwithWCFandLINQ\Projects directory. We will have a subfolder for each solution we create, and under this solution folder, we will have one subfolder for each project.

Read more: Codeproject

Posted via email from .NET Info
EventbasedPipelineSystem

|
The project implements a framework for event-based method pipelines with easy to use multi-threading support.
It's developed in C#/.Net Framework.

Read more: Codeplex

Posted via email from .NET Info

Microsoft XAML Toolkit CTP - July 2010

|
The XAML Toolkit bits are available here.  (actually soon to be posted  -- Brian)

Overview

Features of the XAML Toolkit

XamlDom – A XAML DOM that is LINQ friendly.  Enables easy static analysis.
XAML FxCop integration – You can run FxCop rules that analyze your XAML against rules.
XAML FxCop rule authoring - A BaseXamlRule implementation that allows you to write custom FxCop rules that target XAML.  We’re also shipping a couple of simple ones including a ValidationRule that will validate your XAML.
SilverlightSchemaContext – A XamlSchemaContext that allows System.Xaml to parse Silverlight XAML for tools use.
What’s New in the XAML Toolkit CTP – July 2010

The UISchemaContext has been removed.
The SilverlightSchemaContext now supports Silverlight Version 3.0, 4.0 and Phone 7.
A SilverlightAssemblyHelper static class has been added to help with loading the correct Silverlight schema version.

Read more: The official blog of the Windows Presentation Foundation Team

Posted via email from .NET Info

State in asp.net

|
היכן ניתן לשמור מידע בעולם ה - web.

כידוע לכל מפתח WEB מתחיל - עולם ה - WEB הינו state less כלומר לפי ההגדרה אתר לא אמור לשמור מידע על המשתמשים בו, למרות זאת הרבה פעמים אנחנו צריכים לשמור מידע.

בפוסט הזה נסכם את האופציות.

צד הלקוח.

עוגיות - עוגיות הם אחד מהאופציות הישנות והטובות לשמירת מידע, היתרון הגדול שלהם הם שניתן לשמור בהם מידע לאורך זמן החיסרון הגדול שלהם שהם נשלחים בכל בקשה לשרת, ניתן לקרוא עוד כאן .

hidden filed - ככל האלמנטים מסוג input הערכים שבהם נשלחים לשרת ולכן אפשר לשמור בו מידע מבלי שהמשתמש יראה, כמובן שאחרי מעבר לדף אחר מאבדים את הערכים.

query string - מאוד דומה ל - hidden field אך הרבה יותר נפוץ ובדרך כלל נשמור בו מעט מידע שיגידו לדף מה לעשות ואיך לטעון את העמוד.

View State - סוג של hidden filed שיודע לקבל כל אובייקט שאפשר לעשות לו סירלזיצייה - היתרון שלו שנקבל בצד השרת את האובייקט ולא מחרוזת.

IE8 DOM Storage - יכולת חדשה של IE8 לשמור מידע בצד הלקוח. לקריאה נוספת

צד השרת

static - משתנים סטטים נשמרים ברמת האפליקצייה ולכן ניתן לשמור בהם מידע כל עוד שהאפליקצייה תהיה בחיים

Application - אותו דבר כמו static רק שהוא Dictionary שה - key הוא מחרוזת וה - value הינו כל אובייקט. (ברירת מחדל בזיכרון שעתיים)

Session אותו דבר כמו application רק שנשמר ברמת המשתמש (ברירת מחדל בזיכרון 20 דקות)

Cache - אותו דבר כמו Application אבל נותן את היכולת לקבוע זמן ריענון או להיות תלוי בקובץ (האם היה שינוי) או בבסיס נתונים.

Output Cache - נותן את היכלות לשמור פלט של html כדי שלא יצטרכו לייצר את כל הדף מחדש - כלומר אם נחליט לשמור את הדף ב - output cache למשך 20 דקות, הראשון שיגיע לעמוד יפעיל את ה - page load וכל שאר האירועים ובמשך 20 דקות כל המשתמשים שיגיעו לעמוד יקבלו את אותו פלט של html שהמשתמש הראשון קבל מתוך הזיכרון של השרת.

Context.Items - שומר את הערכים למשך ה - Request הנוכחי.

Read more: שלמה גולדברג (הרב דוטנט) Part 1, Part 2

Posted via email from .NET Info

The Most Powerful and Feature Rich Web-Based Code Editors (IDEs)

| Wednesday, July 28, 2010
   With all the talk of Cloud computing at the moment and after reading a short article on Dzones blog a few months back that questioned whether or not It Was the Right Time for Web-Based IDEs? (it was a split poll), we were inspired enough to venture out and find out what web based IDEs (integrated development environment) are available and which actually are the best. The results were a little bit surprising.

   What we found was literally hundreds upon hundreds of different web based editors, tools and generators for every possible language you could think of. The problem was that very few met with the criteria of being the powerful and feature rich IDE we were looking for. A lot of these tools had either not been updated in years or did they pack enough features to be deemed useful or functional in the grander scale. Other tools, look like they may have potential, but development has disappointingly slowed down.
As you may have guessed there have been many attempts at browser based IDE’s over the past few years, so what we have compiled for this article is a selection of IDEs that are not only functional, polished and professional, but are also ready to take the next big step and be the best web based code editing solution. Here is our favorite selection of web-based IDEs:

Reader Opinion: What do you think? Are you ready to take the step and use a web based IDE?

CodeRun – A free, Cross-Platform Browser-Based IDE

web_based_editor_01.jpg

CodeRun – A free, Cross-Platform Browser-Based IDE is a free and open-source web based IDE, which features native support for C#/.NET (3.5), PHP (5.1), JavaScript, HTML and CSS. C# support includes ASP.NET, WCF, Silverlight and WPF browser application development and deployment. Database support includes SQL Server 2005 and Amazon SimpleDB.
Syntax coloring and code completion are featured to help you during development. It also features an online debugger that allows you to set breakpoints, step through your code, inspect call stack, and other debugging actions.


Bespin
From Mozilla Labs, Bespin aims to be a ‘top-of-the-line text editor that lives in your browser’. It is based on the latest web standards and does require a “modern browser” with support for HTML5 and specifically the Canvas element with the ability to draw text.
Depending on what you’re trying to accomplish and how much time you’re willing to invest, there are several ways in which you can use Bespin: You can try the IDE directly (Bespin demo), download Bespin Embedded for use in your own applications or you can setup your own Bespin server (not for the faint of heart!).


Read more: speckyboy

Posted via email from .NET Info

Profiling an application with Visual Studio – Memory allocation

|
I discussed the possibilities of CPU sampling and instrumentation data collection in the previous articles and now it is time to benchmark the application performance indicators that target the memory.

To test this feature out, I created another sample application. This time, it works with files and I tried to create a simulation of a memory-consuming process.

The setup
It is a simple C# Console Application with only one method – Main. All the code is executed inside that method and no calls to external libraries are made. Here is what it looks like:

using System;
using System.IO;

namespace ConsoleApplication
{
   class Program
   {
       static void Main(string[] args)
       {
           string[] fileList = Directory.GetFiles(@"D:\Temporary");

           foreach (string file in fileList)
           {
               Console.WriteLine("Getting bytes for " + file + "...");
               Console.WriteLine("Bytes for " + file + ": " + File.ReadAllBytes(file).Length);
           }

           Console.Read();
       }
   }
}

What this code does is it gets the file paths (given a specific source folder) and then reads the file contents for each file separately to a byte array. For large files, this process will allocate quite a bit of memory, so that is a perfect way to demonstrate the capacities of built in profiling tools when it comes to memory allocation benchmarking.

As you can see from the code I am showing here, I am referencing a path that points to a folder called Temporary. To test it out, I copied a set of small and not so small files over there (a bunch of large texture files and a movie). And that is pretty much everything that is needed to simulate intensive memory consumption.

Trying it out – getting and analyzing the results
To start the process, go to Analyze > Launch Performance Wizard and select .NET Memory Allocation (Sampling)

Read more: DZone

Posted via email from .NET Info