This is a mirror of official site: http://jasper-net.blogspot.com/

Windows high speed logging: ETW in C#/.NET using System.Diagnostics.Tracing.EventSource

| Wednesday, August 22, 2012
In my introduction to EventSource  posting and my posting of the EventSource specification, I tried to give you the 'quick start' for using EventSource to generate ETW events from C# (or any .NET language).   

In this posting I would like to back a bit and motivate the 'why' behind event tracing for windows (ETW) and EventSource in particular. 

What is the problem ETW / EventSource are trying to solve?

Simply put, EventSource was designed to solve the 'in the field monitoring/diagnostic' problem.    It can be useful for client applications, but its real value tends to be on the server side.   Diagnosing issues on servers is particularly hard because

  1. The servers are handling real user requests, so you don't have the luxury of disrupting users by attaching a debugger and stepping through code.
  2. Often the problems tend to only reproduce under load, which means they tend to be non-deterministic, so you don't even know when/where to attach.
  3. Within even a single process, server applications tend to be doing dozens of requests simultaneously, making it difficult to separate the processing of a particular request
  4. The problems are often performance issues, which if they are not dramatic, are hard to isolate from everything else going on
  5. You tend to have many servers, which means that even if you log, the volume of data requires that have automation for parsing the logs.

Thus for 'in the field' diagnosis, logging is the 'obvious' solution to getting the information you need.   What would an 'ideal' logging mechanism look like

  1. It would have zero overhead when it was turned off (pay for play)
  2. It would be very fast when it was on
  3. It would purturb the normal workings of the program as little as possible, even processor scheduling decisions (e.g. it would not take locks or cause extra context switches ...)
  4. It would caputure very accurate timestamps that work across processors so that races could be diagnosed. 
  5. It would allow extra data to be logged along with the fact that the particular event happen (e.g. file names URLs)

QR: Inline image 1

Posted via email from Jasper-net

Mono 2.11.3 is out

|
This is our fourth preview release of Mono 2.11. This version includes Microsoft's recently open sourced EntityFramework and has been updated to match the latest .NET 4.5 async support.

We are quite happy with over 349 commits spread like this:

 514 files changed, 15553 insertions(+), 3717 deletions(-)

QR: Inline image 1

Posted via email from Jasper-net

How to Secure SSH with Google Authenticator’s Two-Factor Authentication

|
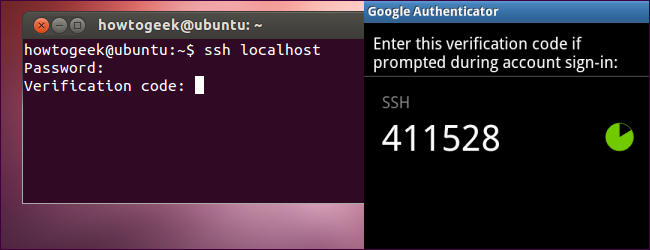
Inline image 2

Want to secure your SSH server with easy-to-use two-factor authentication? Google provides the necessary software to integrate Google Authenticator’s time-based one-time password (TOTP) system with your SSH server. You’ll have to enter the code from your phone when you connect.

Google Authenticator doesn’t “phone home” to Google — all the work happens on your SSH server and your phone. In fact, Google Authenticator is completely open-source, so you can even examine its source code yourself.

Install Google Authenticator
To implement multifactor authentication with Google Authenticator, we’ll need the open-source Google Authenticator PAM module. PAM stands for “pluggable authentication module” – it’s a way to easily plug different forms of authentication into a Linux system.

Ubuntu’s software repositories contain an easy-to-install package for the Google Authenticator PAM module. If your Linux distribution doesn’t contain a package for this, you’ll have to download it from the Google Authenticator downloads page on Google Code and compile it yourself.

To install the package on Ubuntu, run the following command:

sudo apt-get install libpam-google-authenticator

(This will only install the PAM module on our system – we’ll have to activate it for SSH logins manually.)

Read more: How-to geek
QR: Inline image 1

Posted via email from Jasper-net

Inline MSIL in C#/VB.NET and Generic Pointers

|
Introduction

The following article discusses how to achieve inline CIL (MSIL/IL) in the C# language as well as VB.NET. Using inline IL allows us to achieve things that the compiler usually prevents us from doing due to type-safety and other safety-checks. An example of such is VB.NET lacks native pointer support and you cannot declare generic-type pointers in C# or VB.NET.

The majority of this tutorial is in C#, but the tool itself supports VB.NET as well. Given you are a proficient enough programmer (which you are assumed to be if you're interested in using inline IL in your code) it is quite simple to understand how all of this applies to VB.NET.

You can learn how to use this tool to export methods to native code here.
How it works 

Post-build-command line is triggered
ILDASM is ran which disassembles your compiled assembly
C#/VB.NET Project is analyzed for IL code
IL code is appropriately inserted into the file (disasm.il) produced by ILDASM
ILASM is ran which reassembles your decompiled assembly and produces a new *.pdb

Implementation

Let's take a look at a simple method in C#:

public static int Add(int n, int n2)
{
    return n + n2;
}

Pulling out our handy tool ILSpy  we can disassemble this method in a compiled assemble which yields the following: 

.method public hidebysig static 
    int32 Add (
        int32 n,
        int32 n2
    ) cil managed 
{
    .maxstack 8
    .locals init (
        [0] int32 CS$1$0000
    )
    IL_0000: nop
    IL_0001: ldarg.0
    IL_0002: ldarg.1
    IL_0003: add
    IL_0004: stloc.0
    IL_0005: br.s IL_0007
    IL_0007: ldloc.0
    IL_0008: ret

Using ILSpy it's very easy to learn how C# or VB.NET does certain things at the IL level. Now, let's code an equivalent method in C# itself using the inline IL tool:  

public static int Add(int n, int n2)
{
#if IL
    ldarg n
    ldarg n2
    add
    ret
#endif
    return 0; // place holder so method compiles
}

As you can imagine, two integers which are arguments are loaded onto the pseudo stack, and then the instruction add pops both arguments off the pseudo stack and pushes the resulting value back onto the stack. You can learn more about operation codes using MSDN's articles for System.Reflection.Emit.OpCodes.

Using inline IL to achieve generic pointers

  I've always thought C# lacked generic pointers. I think it's a tad silly you can apply the constraint class to a generic and assign null to a variable of T it but, if you applied the constraint struct you couldn't make a pointer variable of T. The reasoning is simple as structures can contain reference field types which you cannot (normally) create a pointer to, but there should still be a way to do this.  

Read more: Codeproject
QR: Inline image 1

Posted via email from Jasper-net

#627 – Detecting Whether The Ctrl Key Is Pressed In a KeyDown Event Handler

|
When you press a Ctrl-key combination (e.g. Ctrl+G) and you are monitoring KeyDown (or KeyUp) events, you’ll see two separate KeyDown events–one for the Ctrl key and one for the key pressed with it.
If you want to respond to a Ctrl-key combination within a KeyDown event handler, you can do the following :
Use the KeyEventArgs.Key property to see whether the event is being fired because the combination key (e.g. ‘G’) is being pressed
Use the Keyboard.IsKeyDown method to check whether the Ctrl key is also currently down

private void TextBox_KeyDown(object sender, KeyEventArgs e)
{
    if ((e.Key == Key.G) &&
        (Keyboard.IsKeyDown(Key.LeftCtrl) || Keyboard.IsKeyDown(Key.RightCtrl)))
             MessageBox.Show("You pressed Ctrl+G !");
}

QR: Inline image 1

Posted via email from Jasper-net

Building a Camera App in Mono for Android

|
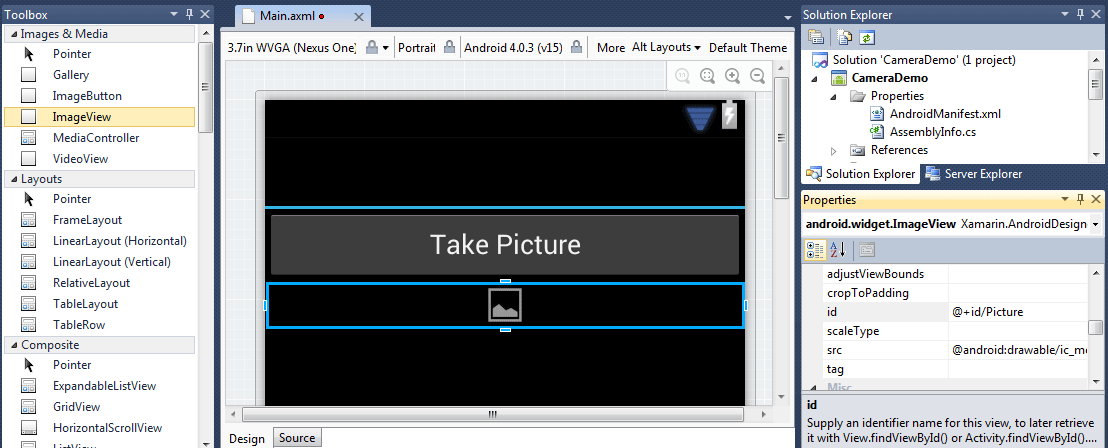
Inline image 2

What makes modern phones so powerful and useful is that they're now much more than just a phone. They come equipped with features like GPS, NFC, Web browsers, high-definition cameras and a myriad of other features outside the realm of simple telephony. As developers, this allows us the opportunity to tap into and combine these features to provide a rich user experience. Your application can know exactly where a user is, what they're seeing, what the weather's like, and any number of other things you can think of.

For many, phones have even taken over the role of being their primary camera. The quality of the cameras included with new phones can rival that of many standalone handheld digital cameras on the market.

Even better, the Android SDK provides the ability to use the built-in camera within your applications. Whether applying photo filters and creating the next Instagram, scanning QR codes, or simply allowing the user to share what they're seeing with friends, Android's camera API takes care of the hard work for you.

There are several options available to make use of the device's camera in an Android application. The rawest method is to hook directly into the camera's feed and implement the surrounding UI yourself. This can be useful if you truly need a customized experience for snapping pictures; in many cases, though, this is overkill for what you'll need.

Android has an overarching theme of keeping things DRY (Don't Repeat Yourself) with regards to creating the activities that make up an application. If another application provides an activity to perform the same task you want in your application, you can simply hook directly into that activity, tying it right into your workflow. This has the added bonus of giving the user a UI they're already familiar with, instead of reinventing the wheel every time.

This article will explore the latter option, using Android's built-in camera activity to allow the user to snap a photo. Once the photo's taken, it will switch back to the application and show the image just captured. To get started, open Visual Studio and create a new Mono for Android application named CameraDemo. Once the project's created, you can delete Activity1.cs since it's not needed; but the rest of the files can be left as-is.

First, declare that the application requires access to the device's camera. In Android, this is done by requesting permissions required in the application's AndroidManifest.xml file. Mono for Android simplifies the creation of this file, allowing you to choose permissions directly through the Visual Studio UI and generate the entries in the manifest automatically at build time.

QR: Inline image 1

Posted via email from Jasper-net

Watch the Video: Building an Open Source Platform as a Service with Red Hat's OpenShift Origin

|
For the past few months, Krishna Raman and I have been giving a really fun presentation called "Building as Platform as a Service with Open Source Software", wherein we outline what a PaaS is show how to build one using Red Hat's OpenShift Origin.

We have presented it at the Red Hat Summit in Boston, and most recently at O'Reilly's OSCON in Portland. Each time we've presented it, the room has been full, with a wonderfully engaged audience. In fact, when we presented at OSCON, we overfilled the room, and had to move to a larger space.

As a result, we've gotten a fair share of emails and tweets from folks who couldn't see the talk live, so we produced a video version. We were fortunate to pull Krishna away from hacking for a few minutes to don his favorite t-shirt and sit in front of the video camera for a few minutes.

Part One: An introduction to the cloud and PaaS

Part one is a 7 minute general overview. Krishna explains what cloud computing is and isn't, and what exactly a PaaS is. In it he describes how a PaaS helps to satisfy both what developers want, and what system operators want. He also introduces the project the powers the OpenShift service, OpenShift Origin on GitHub.

Part Two: OpenShift Origin architecture and how to build a PaaS

Part two is 20 minutes long in a good way. It is intended for people who want to install their own OpenShift Origin instance and start hacking away on it. This is an introductory "under the hood", how the magic works behind the curtain video.

He discusses what OpenShift considers an "app" to be: a runtime environment plus someone's code, contained in a Git repo. Next is an exploration of the rhc command line tool, used for creating a DNS namespace, ssh keys, and creating apps.

Read more: OpenShift
QR: Inline image 1

Posted via email from Jasper-net

mIP - 100% C# Managed TCP/IP Stack for the .NET Micro Framework

|
Inline image 1

mIP - A C# Managed TCP/IP Stack for .NET Micro Framework

mIP (short for Managed Internet Protocol) is a 100% managed TCP/IP stack for .NET MicroFramework

The purpose of mIP is to empower the C# developer to debug and add advanced networking features without having to change the firmware or learn C++. Since this is targeted to embedded devices, this library strives to use a minimal memory footprint. Also, the classes and methods MUST be simple and obvious to use and the critical public methods will be commented properly to allow for proper intellisense. Also, initially, the focus is to enable web server functionality

Read more: Codeplex
QR: Inline image 2

Posted via email from Jasper-net

Creating WPF Data Templates in Code: The Right Way

|
...
...

The Right Way

The MSDN article for FrameworkElementFactory then goes on to say:

The recommended way to programmatically create a template is to load XAML from a string or a memory stream using the Load method of the XamlReader class.

The trouble is, the XAML parser they give you in .NET framework is not quite the same as XAML parser that comes with VIsual Studio. In particular, you need to apply some tricks in order to deal with C# namespaces. The resulting code looks as follows:

DataTemplate CreateTemplate(Type viewModelType, Type viewType)
{
    const string xamlTemplate = "<DataTemplate DataType=\"{{x:Type vm:{0}}}\"><v:{1} /></DataTemplate>";
    var xaml = String.Format(xamlTemplate, viewModelType.Name, viewType.Name, viewModelType.Namespace, viewType.Namespace);

    var context = new ParserContext();

    context.XamlTypeMapper = new XamlTypeMapper(new string[0]);
    context.XamlTypeMapper.AddMappingProcessingInstruction("vm", viewModelType.Namespace, viewModelType.Assembly.FullName);
    context.XamlTypeMapper.AddMappingProcessingInstruction("v", viewType.Namespace, viewType.Assembly.FullName);

    context.XmlnsDictionary.Add("", "http://schemas.microsoft.com/winfx/2006/xaml/presentation");
    context.XmlnsDictionary.Add("x", "http://schemas.microsoft.com/winfx/2006/xaml");
    context.XmlnsDictionary.Add("vm", "vm");
    context.XmlnsDictionary.Add("v", "v");

    var template = (DataTemplate)XamlReader.Parse(xaml, context);
    return template;
}

The bad news is that this code is much more verbose and awkward then the naive code. The good news is that this code works better. In particular, it has no problem with forward bindings.

Another bad thing about the new way of creating templates is that both view and view model classes must be public in .NET 3.5. If they are not, you'll get a runtime exception when parsing the XAML that says they should be. .NET 4 does not have this limitation: all classes may be internal.

Registering Data Template with the Application

In order to create visual objects using your data tempalte, WPF must somehow know about it. You make your template globally available by adding it to the application resources:

var key = template.DataTemplateKey;
Application.Current.Resources.Add(key, template);

Read more: Codeproject
QR: Inline image 1

Posted via email from Jasper-net

C# Language Specification 4.0

|
Overview
The C# Language Specification provides a complete description of the C# language 4.0.

Read more: MS Download
QR: Inline image 1

Posted via email from Jasper-net

Patterns for Parallel Programming: Understanding and Applying Parallel Patterns with the .NET Framework 4

|
Overview

   This document provides a detailed and in-depth tour of support in the Microsoft® .NET Framework 4 for parallel programming. This includes an examination of common parallel patterns and how they’re implemented without and with this new support in the .NET Framework, as well as covering best practices for developing parallel components utilizing parallel patterns.

Read more: MS Download
QR: Inline image 1

Posted via email from Jasper-net

A Plethora Parallel Programming PDF’s - 12 Parallel Programming with the .NET Framework 4 articles for download

|
A set of articles that provide information on parallel programming with the .NET Framework 4.

OptimizingUsingConcurrencyVisualizer.pdf 2.1MB
ParallelProgramsinNET4_CodingGuidelines.pdf 964KB
ParentChildTPLTasksRelationship.pdf 787KB
PerformanceCharacteristicsOfSyncPrimitives.pdf 800KB
PerformanceCharacteristicsOfThreadSafeCollection.pdf 682KB
PLINQOrderingModel.pdf 1.0MB
TPLOptionsTour.pdf 1.1MB
Using Net4ToAchieveDataParallelism.pdf 925KB
UsingCancellationinNET4.pdf 1.1MB
UsingPLINQinOfficeAddins.pdf 761KB
WhenToUseParallelForEachOrPLINQ.pdf 527KB
WorkflowAndParallelExtensionsinNET4.pdf 648KB

Quick Details

Version: 1.0

Date Published: 4/26/2010

Language: English

The .NET Framework 4 includes extended support for writing parallel applications, through enhancements to the CLR itself as well as through new libraries commonly referred to as "Parallel Extensions to the .NET Framework." The set of articles available in this download provides detailed information on Parallel Extension, including the Task Parallel Library (TPL), Parallel LINQ (PLINQ), and a set of new coordination primitives and thread-safe data structures. These articles provide insights into performance characteristics, usage patterns, best practices, integration of parallelism with other programming frameworks, and more.

QR: Inline image 1

Posted via email from Jasper-net

Calling IPP Functions from C# Code

|
Intel Integrated Performance Primitives, also known as IPP, is a library of highly optimized math software functions for digital media and data-processing applications. The functions use multiple threads and the most appropriate SIMD instructions to achieve the best performance according to instruction set architecture available in the underlying hardware. You can call IPP functions from your C# code through Platform Invokes, also known as P/Invokes.

Intel IPP 8.0 or higher includes all the necessary code that allows you to easily call IPP functions in any C# project. However, the necessary code is included in an almost hidden language-related samples zip file. Thus, you have to decompress the zip file in a new folder to find the necessary C# files that will allow you to call the different IPP functions. These samples are usually compressed into a file called "ipp-samples-language.zip" and located within the IPP subfolder of the Intel product that includes IPP. If you have problems locating this file, you can just search for it in the Intel folder found in Program Files (x86). For example, Intel Parallel Composer 2011 includes the IPP samples in Program Files (x86)\Intel\Parallel Studio 2011\Composer\Samples\en_US\IPP. See Figure 1. In a 32-bit Window version, instead of the Program Files (x86) folder, it will be just the Program Files folder.

using System;
using System.Drawing;
using System.Drawing.Imaging;
using System.Threading.Tasks;
using System.Windows;
using System.Windows.Media.Imaging;
using System.Windows.Navigation;
using System.Windows.Shapes;
using System.Windows.Interop;
using ipp;
 
namespace IppCSharpExample
{
    public partial class MainWindow : Window
    {
        public MainWindow()
        {
            InitializeComponent();
        }
 
        private BitmapData GetBitmapData(Bitmap bitmap, ImageLockMode lockMode)
        {
            return bitmap.LockBits(
                new System.Drawing.Rectangle(0, 0, 
                    bitmap.Width, bitmap.Height),
                lockMode,
                System.Drawing.Imaging.PixelFormat.Format24bppRgb);
        }
 
        unsafe private Bitmap ApplyFilterSobelHoriz(string fileName)
        {
            var originalImage = new Bitmap(fileName);
            var sourceBitmapData = GetBitmapData(originalImage, ImageLockMode.ReadOnly);
 
            var destinationImage = new Bitmap(originalImage.Width, originalImage.Height);
            var destinationBitmapData = GetBitmapData(destinationImage, ImageLockMode.ReadWrite);
 
            IppiSize roi = new IppiSize(originalImage.Width - 3, originalImage.Height - 3);
 
            const int ksize = 5;
            const int half = ksize / 2;
            byte* pSrc = (byte*)sourceBitmapData.Scan0 + (sourceBitmapData.Stride + 3) * half;
            byte* pDst = (byte*)destinationBitmapData.Scan0 + (destinationBitmapData.Stride + 3) * half;
 
            IppStatus status = ipp.ip.ippiFilterSobelHoriz_8u_C3R(
                pSrc, sourceBitmapData.Stride,
                pDst, destinationBitmapData.Stride,
                roi);
(more...)

Read more: Dr Dobbs
QR: Inline image 1

Posted via email from Jasper-net

Samples for Parallel Programming with the .NET Framework

|
The .NET Framework 4 includes significant advancements for developers writing parallel and concurrent applications, including Parallel LINQ (PLINQ), the Task Parallel Library (TPL), new thread-safe collections, and a variety of new coordination and synchronization data structures.

This sample includes example applications and library functionality that demonstrate, utilize, and augment this support (it is not production quality). This sample is a single .zip containing a single Visual Studio .sln file, which then contains multiple Visual Studio projects that highlight key capabilities provided by the .NET Framework 4 and the parallel programming support it provides. Below are descriptions of the included examples.

(For discussions of Parallel Extensions and/or these samples, visit the forums at http://social.msdn.microsoft.com/Forums/en-US/parallelextensions/threads. For documentation on the parallelism constructs in .NET 4, see http://msdn.microsoft.com/en-us/library/dd460693(VS.100).aspx. For information direct from the Parallel Extensions team, subscribe to the team blog at http://blogs.msdn.com/pfxteam. For videos/articles on parallelism and Parallel Extensions, visit the Parallel Computing Developer Center at http://msdn.com/concurrency.)

Read more: MSDN Samples
QR: Inline image 1

Posted via email from Jasper-net

Roslyn: C# is cheating on me with JavaScript (or how to compile C# into JavaScript)

| Tuesday, August 21, 2012
While working extensively on development of the Single Page Applications (SPA) I was facing a fact that my server-side data models were evolving quicker than their JavaScript counterparts. Both the client-side and the server-side data models were getting quickly out of sync.

The brute force solution of using the T4 templating engine to emit both the client-side and the server side data models didn’t look that appealing to me. Primarily due to a simple fact that it’s not that easy to refactor the T4 templates. And, the ReSharper junkie like me, can’t tolerate this fact.

So I’ve decided to give the latest release of Roslyn compiler-as-a-service CTP another spin and use it as part of my build sequence and compile my C# models directly into the appropriate JavaScript ones. This was giving me the advantage of using the C# as a primary development environment and leaving the JavaScript to follow the “big-brother”.

Jinx C#-to-JavaScript compiler was created as a result of this exercise. You’re welcome to get the Jinx source from the GitHub. I’ll appreciate any collaboration on this project.

Note: all of the code is an intermediate solution that was answering my personal needs for the project I was running. It is in no-way represent the full fledge solution. If you want something bigger and more feature-reach, you can either contribute to my solution or look into projects like Script# or SharpKit.

The workflow, I ended up with, was very simple:

Build a web application
In the web application create C# data models and, those that have to be compiled to JavaScript, mark them with the [JavaScript] attribute (*)
As a post-build step, run the “jinxc” command line compiler to emit the JavaScript data models directly into your Scripts folder
(*) – I’ve decided to use attribute as an option to reduce unnecessary noise from the compilation. The compiler will ignore all of the non-marked classes. This is not a requirement, but an option.

The example, we’re going to discuss here, is a simple To-Do list SPA application (based on the ToDoMvc with Knockout.js) with the Asp.Net WebApi REST service.

The simple C# data model that I needed for the client-server communication looks like this:

[JavaScript]
public class ToDoItem
{
  public Guid guid { get; set; }
  public string title { get; set; }
  public bool completed { get; set; }
}

QR: Inline image 1

Posted via email from Jasper-net

Intalling VMware Player on Ubuntu 12.04

| Monday, August 20, 2012
In my pursuit to learn Hadoop, I decided to use one of the Hadoop virtual machine images provided by Cloudera before actually installing Hadoop on my Ubuntu 12.04. Cloudera provides virtual machines for VMWare, KVM and VirtualBox. For more information about Cloudera Hadoop virtual  machines, please visit Cloudera Demo VM . I decided to go with VMWare image. This required me to install VMWare player. In this blog, you will find step by step instructions to install VMWare player and solution to the problems faced during this process.

1. While looking for VMWare Player(vmplayer) installer, i found that vmplayer installer is not provided by the repositories, you have to instead download it from VMware website. While downloading please make sure that you download the latest and correct version for your architecture. That is, if you’re running the 32-bit version of Ubuntu, get the 32-bit version, and if you’re running the 64-bit version of Ubuntu, get the 64-bit version. To find out the version of Ubuntu running on your computer, type in uname -m  from the terminal and press enter. If the result is x86_64, you’re running the 64-bit version of Ubuntu. If it says i686, you’re running the 32-bit version of Ubuntu.

2. The downloaded file is VMware-Player-4.0.3-703057.x86_64.txt for the 64-bit version. The download will vary depending upon Ubuntu version(32-bit vs 64-bit) and version of the vmplayer. Before installing vmplayer, check the file permissions of the downloaded file. You need to have execute permissions on the file. If you do not have execute permissions on the file, please execute the following command to change the mode of the file to have execute permissions.

chmod +x VMware-Player-4.0.3-703057.x86_64.txt
3. The installer may need to build and install kernel modules, so it’s advisable to make sure you have the necessary packages to facilitate this. Run uname -r. The output should end in generic, generic-pae,server, or virtual. If it doesn’t end in generic, replace generic below with whatever it does end in.

sudo apt-get update
sudo apt-get install build-essential linux-headers-generic

4. Now run the installer. You have to run it as root, so use sudo:

sudo ./VMware-Player-4.0.3-703057.x86_64.txt

QR: Inline image 1

Posted via email from Jasper-net